A festive Fall Wreath is a great way to dress up your door this autumn! In this do-it-yourself fall wreath tutorial we are going to show you how to make a fall wreath that will give your front door major “WOW” factor. Some links in this post may lead to websites where we are an affiliate. Click [HERE] for our disclosure statement.
Home Decor: How to Create a Rustic Fall Scarecrow Wreath
Fall Decor—Beautiful leaves on the trees, cool crisp air, hay rides, and fall festivals are just some of the joys of autumn. Scarecrows have been around for about 3,000 years to protect fall crops from crows that would eat bountiful harvests. Nowadays, you’ll usually see them more as decorations (I guess crows are just too smart!), though they’re certainly effective in smaller garden patches.
Step-by-Step Instructions for Creating a Rustic Fall Scarecrow Wreath
In this craft, you will create a whimsical and rustic-looking scarecrow wreath to welcome friends and family to a Halloween, Thanksgiving or fall harvest party at your home.
Here is what you will need:
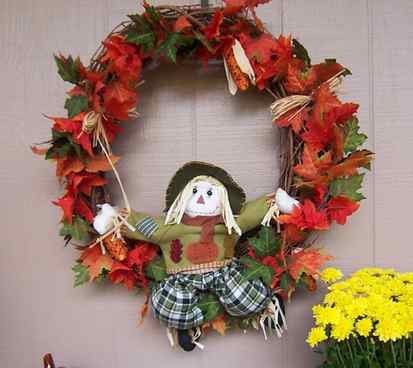
- One 18″ or one 24″ grape vine wreath. (24″ is used in this garland)
- Two 6′ fall garlands of your choice, more if you want a fuller leaf effect. The wreath can be made from maple or oak. The one pictured is made of synthetic maple leaves. There are many varieties to choose from at a craft store. Some come with berries, hay, acorns, and even imitation corn.
- Some paddle wire, also known as florist wire. 26 gauge is used in this wreath but any size will do nicely.
- A wire cutter
- A pair of needle nose pliers
- A scarecrow doll
- A wreath hanger
- Some twine or string (optional) that will blend in with the colors on the wreath
Instructions
Step 1: Cut about 2-3 inches of paddle wire off the spool.
Step 2: Place the wreath on a table. Beginning at the bottom of the wreath, place the garland in a clockwise circle on top of the wreath. Getting good placement is important so that you will get an idea of how the finished wreath will appear.

Step 3: Anchor the bottom piece of garland by threading the wire through the grapevine and twisting like you would a use a twist tie on a garbage bag. Needle nose pliers may be used so the wire doesn’t hurt your fingers and a better, tighter grip is possible. Cut off any excess wire after twisting and use the pliers to point sharp edges away by tucking wire towards the back of the wreath.
Step 4: Repeat Step 3 every 5 inches or so. Before moving to step 5, inspect your work. Hold the wreath up vertically to check that there is no sagging of garland on the wreath. If sagging occurs, add additional paddle wire to fasten garland to the wreath.
Step 5: Place the scarecrow as if he or she is sitting atop the wreath. Take paddle wire and tie it tightly around the wrists of the scarecrow. Affix the additional length of wire to the garland. Repeat the same process with the ankles.
Step 6: Place wreath hanger over door with the curved end at the bottom. Place wreath on wreath hanger.
Fall wreaths are fabulous ways to showcase your home and create a feeling of warmth. We’ve made a couple as part of our party decor for fall. Be sure to add a few chrysanthemums to flank your front doorstep and perhaps a pumpkin or two for maximum effect. This wreath can also be made as a special gift to brighten up someone else’s doorstep, too!
We actually used an old doll our kids no longer play with for our wreath.
What fall crafts and DIY projects are you undertaking this season? How do you dress your home up for the holidays? How can you get your kids involved in handmade projects?
- Bio
- Latest Posts
Chris Molnar
Chris’s eldest daughter (5) knows that the word “Hawaii” equals a fun, sunny destination, even if she’s not quite sure where it is. With the hot weather this summer and a couple tiki torches haunting his garage from last year, it’s definitely time for another luau party. You can visit Chris on his Facebook page – drop by and say aloha!
How to Make a Scarecrow Wreath and More OLIKA Ideas
This post and photos may contain Amazon or other affiliate links. If you purchase something through any link, I may receive a small commission at no extra charge to you. Any supplies used may be given to me free of charge, however, all projects and opinions are my own.
Are you ready to see how to make an adorable scarecrow wreath? I am partnering with OLIKA today to share some recycling ideas for their Birdie hand sanitizer. All projects and opinions are my own however. I also came up with a cute recycled Christmas ornament idea for y’all as well. So whichever way you want to recycle your empty Birdie container, I have all of the details below.

But first, who is this Birdie by OLIKA? He may very well by the world’s most beautiful hand sanitizer. And this bird is ideal for traveling or carrying in your purse every single day!

Isn’t he adorable? But Birdie is not just a looker….he also works when you need him to!

This hand sanitizing spray contains essential oils and aloe vera leaf juice. It is perfect for cleaning your hands while freshening them with a sweet aromatic smell.

My favorite part? There are wipes in the bottom of Birdie! I was so excited when I saw this! Perfect for kid messes and wiping down your hands. Imagine using those to wipe down the shopping cart handle. Oh yes! Now you want one in your purse, am I right?

But what do you do when your Birdie is all empty with no wipes left? He is too darn cute to throw out! So I have two ideas for you to recycle him into something adorable.

Table of Contents
Scarecrow Wreath
I am going to start with the fall idea and move on to the Christmas idea a bit later in this post. This scarecrow wreath may very well be one of my favorite projects of all time. It will look great hanging on your front door.

Supplies needed to make your own scarecrow wreath:
- Birdie by OLIKA (two empty containers)
- Clothes hanger
- Small shirt and pants (find them at a thrift store!)
- Straw hat
- Bandanna
- Raffia
- Wood shims or other scrap wood pieces
- Rope
- Black spray paint
- Hot glue and glue gun
- Scissors

I thought a quick video of these OLIKA projects would be perfect! You can watch below to see just how to make the scarecrow wreath.

Start your wreath by adding some wood shims or other scrap wood pieces to the top of your hanger on both sides. Just use hot glue to secure into place. These will make a perch for Birdie later.

Add raffia in the pocket with hot glue. You can trim any strands to size with scissors.

You will also want to add raffia to the hand portion of both arms. Be sure to also secure the arms to the shirt with a bit of hot glue as well so that they stay in place. Then add on your pants with a bit of additional hot glue. Give your DIY scarecrow a rope belt as well.

Tie both legs with a bit of rope then add in some raffia with hot glue.

Tie a bandanna onto the clothes hanger “neck”.

Add your hat to the hanger as well. I found that I could just set it on there when on the door however you can secure with hot glue if you wish.

Now it is time to add on Birdie! Add some hot glue to the bottom and secure to both shoulders. You may have to go inside the shirt and add some hot glue from the shirt to the wood as well.

Once a black Birdie has been placed on both shoulders, this scarecrow wreath is ready for your front door.

You will love how these scarecrow decorations look and the touch of fall it brings to your decor.

You just learned how to make a scarecrow wreath this season! Get started on your own as you are sure to love the results.

Have more Birdies to recycle? I have a recycled Christmas ornament idea for you as well. This one actually doubles as an ornament as well as a container for a small gift. See how to make your own below!

Supplies needed to make your own recycled Christmas ornament:
- Birdie by OLIKA (one empty white Birdie)
- Red pom pom trim
- Ribbon
- Felt
- Gift tag
- Scissors
- Circle cutter (optional)
- Marker
- Hot glue and glue gun
I actually did a quick video for this one as well. Watch below to see how easy it is to make this recycled Christmas ornament!

Recycled Christmas Ornament Instructions:
- Start by hot gluing pom pom trim around the horizontal line on Birdie.
- Then hot glue the ribbon into place for hanging.
- Add some felt to line the container on the bottom for your gift.
- Cut a two inch circle from felt for this purpose. I find that a circle cutter makes this easier but you can also trace a circle and cut with scissors.
- Push the felt into the bottom container before adding in your gift.
- Write on a gift tag and tie on before adding to the tree.

Birdie will look perfect hanging on the tree and your gift recipient will love that they get both an ornament as well as a small gift on the inside.

This container is perfect for small gifts especially jewelry. So if you are perhaps giving a necklace to someone that you love, consider making this recycled Christmas ornament to wrap the gift! They will love the sweet sentiment.

Grab a couple Birdies today so you can make one or both of these ideas. Be sure to tell us in the comments if the scarecrow wreath or the recycled Christmas ornament is your favorite. Also, what other ideas do you have for Birdie? Keep one in your purse at all times and be sure to save those empty containers. There are so many possibilities!

About Angie Holden
For over a decade, I have been sharing Cricut tutorials and craft ideas here as well as on my YouTube channel. My passions include teaching others to be creative and learning as many new things as possible.
HERE IS WHAT YOU WILL NEED TO MAKE A DIY SCARECROW WREATH:
- 14 Inch Grapevine Wreath
- Scarecrow Wreath Attachment
- Velvet Pumpkins
- Fall Colored Hydrangeas
- Assorted Fall Flowers & Foliage
- Assorted Wired Ribbon or Pre-Made Bow – Here is a great tutorial on how to make a bow using a Bowdabra bow maker!
- Wire Cutters
- Florist Wire
- Glue Gun (Here is the link to the Glue Skillet we use!)
- Glue Sticks
- Bowdabra Bow Maker
This fall scarecrow wreath is so cute and it’s the perfect way to spruce up your door this fall! If you loved this DIY fall project be sure to let us know! If you would like to learn how you can make and sell designer door wreaths, be sure to join Design With The Pros Club HERE!
If you enjoyed this post, you may also like:
- DIY Fall Wreath Under $15
- DIY Fall Owl Wreath
- How to Make Deco Mesh Pumpkin
- The Five Biggest Mistakes of Wreath Making
- Fall Dollar Tree Haul
- Fall Red Truck Wreath Tutorial
- Best Ribbon for Fall


