This answer was written by one of our trained team of researchers who validated it for accuracy and comprehensiveness.
How to Print Multiple Images on One Page Using Windows and macOS
This article was reviewed by Luigi Oppido and by wikiHow staff writer, Ali Garbacz, B.A.. Luigi Oppido is the Owner and Operator of Pleasure Point Computers in Santa Cruz, California. Luigi has over 25 years of experience in general computer repair, data recovery, virus removal, and upgrades. He is also the host of the Computer Man Show! broadcasted on KSQD covering central California for over two years.
This article has been fact-checked, ensuring the accuracy of any cited facts and confirming the authority of its sources.
This article has been viewed 441,943 times.
If you need lots of photos for a project or just want to save paper when printing, you might find yourself needing to print lots of pictures on a single sheet of paper. We’re here with a step-by-step guide to help both Windows and macOS users get this task done.
Things You Should Know
- For both Windows and macOS, select the photos you want to print, navigate to the Print menu, and choose the Contact Sheet option to put multiple images on one page.
- For Windows users, use the Wallet option or change the paper size to adjust the number of photos on one page.
- Make sure your printer is loaded with the right sized paper and connected to your computer before starting.
Steps
Method 1
Method 1 of 2:
Windows
Fair Use (screenshot)
n”>
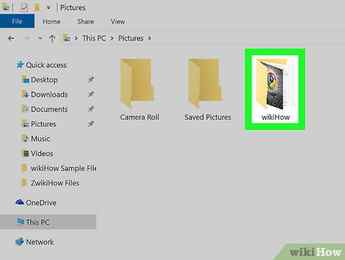
Open the folder that contains the photos you wish to print. It’s best to keep all of the photos you want to print together in a separate folder to make selecting them easier.

Fair Use (screenshot)
n”>
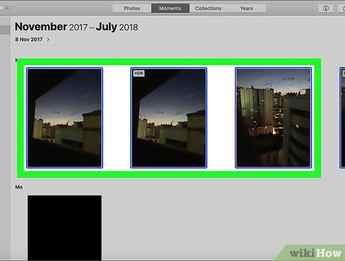
Select the photos you want to print. To select multiple photos, hold the Ctrl key as you click each file. You can also hold down the left button on the mouse and drag your mouse over the photos.
Advertisement

Fair Use (screenshot)
n”>
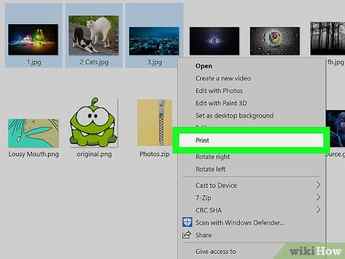
Right-click on the selected photos. This opens up a contextual menu.
Fair Use (screenshot)
n”>
- If you are using Windows 11, and no “Print” option appears, select “Show more options” first, then look for the “Print” option.

Fair Use (screenshot)
n”>
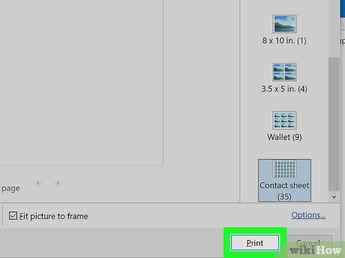
- Wallet allows you to fit up to nine images on a single piece of paper.
- If you’re just printing two images, you can choose to print them to a single page at 4 x 6 inches or 5 x 7 inches.
- If you’re printing four images, you can choose the 3.5 x 5 inch option.
Fair Use (screenshot)
n”>
- Make sure your printer is turned on, filled with the correct paper size, and properly connected to your computer before printing.
- If your printer isn’t already selected, choose your printer’s name in the “Printer” drop-down menu first.
Advertisement
Method 2
Method 2 of 2:
macOS
Fair Use (screenshot)
n”>
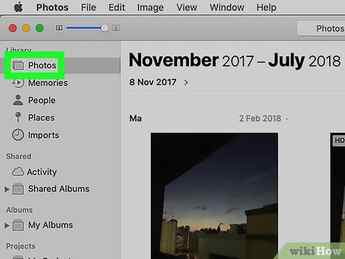
Open the folder containing the photos you wish to print. To make finding and selecting your photos easier, save all of the photos you want to print together in one folder.
Fair Use (screenshot)
n”>
Select the photos you want to print. To select multiple photos, hold the ⌘ Command key while clicking each photo. You can also hold down the left button on the mouse and drag your mouse over the photos.
Fair Use (screenshot)
n”>
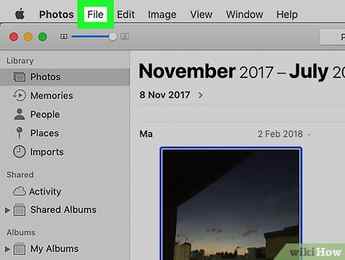
Click the File menu. This option is in the upper left corner of the window.
Fair Use (screenshot)
n”>
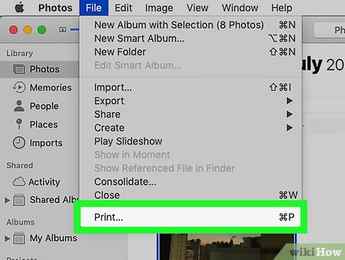
Click Print . This option appears in the drop-down menu after you click File. This opens up a print preview screen that shows you the images you selected.

Fair Use (screenshot)
n”>
Click the Contact Sheet option. This is on the right side of the print menu at the bottom of the available options.

Fair Use (screenshot)
n”>
- Make sure your printer is turned on, filled with the appropriate paper size, and properly connected to your computer before you start printing.
- You may have to select your printer’s name from the “Printer” drop-down menu first.
Advertisement
Preparing the Picture
To prepare the picture for printing on multiple pages in Microsoft Word, start by resizing the picture and adjusting the margins. This will ensure that the picture is appropriately sized and fits within the printable area. By following these steps, you can break down a large picture into smaller, printable sections for a visually appealing final result.
Resizing the Picture
- Open your image editor – like Adobe Photoshop or GIMP.
- Import the picture you want to resize.
- Look for the “Resize” or “Image Size” option.
- Set the desired width and height. Maintain the aspect ratio to avoid distortion.
- Select a resampling method like “Bicubic” or “Bilinear” to preserve quality.
- Click “OK” or “Apply” to implement changes. Save with a new filename.
- Remember factors such as platform requirements, intended use, and pixel density for optimal results.
Did you know? Resizing pictures dates back to 1982 when Russell Kirsch developed a program to alter pixel density – the foundation of modern image editing!
Adjusting the Margins
Adjusting the margins is key for a visually pleasing document. You can adjust the empty space around your text and images, giving it a professional look. Here’s how in 3 simple steps:
- Open your document editor, then go to “Page Layout” or “Margins”. It’s usually in the toolbar or under “File”.
- Go to the margin settings. Choose from predefined options like “Normal”, “Narrow” or “Wide”. Or, customize with specific measurements.
- Preview the changes with the “Print Preview” feature. Make any needed changes before finalizing.
It’s important to balance readability and visual appeal. Different types of documents require different margins. For example, wider margins are great for formal reports and academic papers. Narrower margins maximize space for marketing materials like brochures or flyers.
The practice of adjusting margins goes back centuries when scribes used meticulous measurements for handwritten manuscripts. Now, it’s much easier with word processing software.
Dividing the Picture
To ensure you can print a large picture on multiple pages using Microsoft Word, you need to divide the picture appropriately. With the sub-sections “Using Microsoft Word’s ‘Print’ Feature” and “Manually Dividing the Picture,” we’ll explore the solutions that each offers for dividing the picture effectively.
Using Microsoft Word’s “Print” Feature
Microsoft Word’s “Print” feature is a great tool for quickly printing documents. Here’s a guide to using it:
- Open the document in Microsoft Word.
- Click on the “File” tab in the top left corner.
- Select “Print” from the drop-down menu. A window with print options will appear.
In this window, you can customize your printing settings, like selecting a printer, adjusting the number of copies, choosing pages to print, and changing the paper size and orientation. Once you’re done, click the “Print” button.
You can also explore more options like double-sided printing or printing multiple pages per sheet.
If you want to print large documents or complex layouts, preview them first. This will help you avoid formatting issues and wasting ink and paper.
To print only certain sections of a document, use Word’s selection feature. Highlight the text first, then choose “Print Selection” instead of “Print All”.
Before modern technology, people had to type or write documents by hand. Word processing software like Microsoft Word changed that.
Now you know how to use Microsoft Word’s “Print” feature and a bit of its history. Next time you need to print out a document, use these steps to make it easy!
Manually Dividing the Picture
Dividing the Picture
When it comes to manually splitting a picture, there’s a few steps for precise & accurate results. Follow this guide for perfectly sized sections every time.
- Decide size: Work out the final size you want for each section. This helps plan the division points.
- Measure & mark: Use a ruler or grid lines to measure & mark the sections. Make sure the markings are clear.
- Use guides: Draw straight lines with a straight edge tool or software. Keeps size & shape consistent.
- Cut precisely: Cut along the marked lines with scissors. Take your time to get accurate cuts.
- Arrange sections: Put the sections in the desired order. Try different compositions before finalizing.
- Secure & display: Attach the sections with tape, glue, or other methods. Then frame or display it.
It’s important to pay attention to detail, like lighting & color consistency between sections.
A photographer once shared a story of dividing his landscape photo into panels for an art exhibition. He followed each step but then realized one small error had destroyed it – two panels were swapped! He managed to fix it & got praise for his divided picture technique.
Manually dividing a picture needs careful planning, precision & attention to detail. By following this guide & learning from experiences, you can master the art of dividing pictures to create stunning visuals.
Printing the Picture
To print a large picture on multiple pages in Microsoft Word, the solution lies in the “Printing the Picture” section. Discover the optimal print settings and learn how to effectively print the picture on multiple pages to achieve the desired outcome. Explore both the sub-sections: “Selecting the Print Settings” and “Printing the Picture on Multiple Pages.”
Selecting the Print Settings
Printing pics? No sweat! Simply adjust your print settings to get perfect results. Start by selecting the right paper size and type. Then, adjust the print quality to get your desired detail. Calibrate your printer for accurate colors and experiment with layout options. And don’t forget to preview on-screen before committing ink and paper resources. There you go!
Printing the Picture on Multiple Pages
- Divide the picture into sections using an image editing software.
- Open a word processing program and create a blank document with multiple pages.
- Put each picture section on separate pages, making sure they line up.
- Adjust the page settings to fit when printed. Set the margins and select the paper size.
- Give the document to the printer and print each page.
- Line up the printed pages to get the full picture.
- Note: some printers have special settings for printing pictures on multiple pages. Look up your printer’s manual or online resources for help.
- Make beautiful visuals! Follow these steps to print your pictures on multiple pages and make them come alive!
How to inflate a picture for printing
Auto-suggest helps you quickly narrow down your search results by suggesting possible matches as you type.
Showing results for
Show only | Search instead for
Did you mean:
- Global community
- Language:
- Deutsch
- English
- Español
- Français
- Português
Dedicated community for Japanese speakers
Dedicated community for Korean speakers
Exit- Home
- Lightroom Classic
- Discussions
- How do I increase photo resolution for printing?
- Home
- Lightroom Classic
- Discussions
How do I increase photo resolution for printing?
Community Beginner ,/t5/lightroom-classic-discussions/how-do-i-increase-photo-resolution-for-printing/td-p/11267757 Jul 06, 2020 Jul 06, 2020
Copy link to clipboard
I am new to Lightroom and need to increase the resolution of photos (300dpi?) and export so my client can print. Please advise with step by step tutorial if possible, thank you!
Translate
More
Reply
Community guidelinesBe kind and respectful, give credit to the original source of content, and search for duplicates before posting. Learn more
14 Replies 14
LEGEND ,/t5/lightroom-classic-discussions/how-do-i-increase-photo-resolution-for-printing/m-p/11267782#M192965 Jul 06, 2020 Jul 06, 2020
Copy link to clipboard
It sounds like you have a very weak understanding of your client’s needs, and the first thing you should do is come to better understanding of what (s)he is asking for.
Lightroom Classic does not control DPI (dots per inch). DPI is not a characteristic of a digital image.
Lightroom Classic can control PPI (pixels per inch) which is different, and is sometimes called resolution. Is this what you are referring to? If so, then when you export a photo, you click on the “Image Sizing” box, you specify a resolution of 300 pixels per inch, then you specify the width and height in inches or centimeters, and then you export.
0 Upvote
Translate
More
Reply
Community guidelinesBe kind and respectful, give credit to the original source of content, and search for duplicates before posting. Learn more
[email protected] AUTHOR
Community Beginner ,/t5/lightroom-classic-discussions/how-do-i-increase-photo-resolution-for-printing/m-p/11267862#M192967 Jul 06, 2020 Jul 06, 2020
Copy link to clipboard
Hi, thank you for your reply! I meant to post in Lightroom not Lightroom Classic- does the info apply to both?
0 Upvote
Translate
More
Reply
Community guidelinesBe kind and respectful, give credit to the original source of content, and search for duplicates before posting. Learn more
LEGEND ,
/t5/lightroom-classic-discussions/how-do-i-increase-photo-resolution-for-printing/m-p/11267911#M192968 Jul 06, 2020 Jul 06, 2020
Copy link to clipboard
I don’t know if it applies to Lightroom as I have never used it.
0 Upvote
Translate
More
Reply
Community guidelinesBe kind and respectful, give credit to the original source of content, and search for duplicates before posting. Learn more
LEGEND ,
/t5/lightroom-classic-discussions/how-do-i-increase-photo-resolution-for-printing/m-p/11268057#M192977 Jul 06, 2020 Jul 06, 2020
Copy link to clipboard
Yes it does. Here’s an example of the settings used in LR Desktop for a 16″ x 20″ print with a 300 dpi printer using glossy paper.
2 2 Upvotes
Translate
More
Reply
Community guidelinesBe kind and respectful, give credit to the original source of content, and search for duplicates before posting. Learn more
[email protected] AUTHOR
Community Beginner ,/t5/lightroom-classic-discussions/how-do-i-increase-photo-resolution-for-printing/m-p/11270371#M193046 Jul 07, 2020 Jul 07, 2020
Copy link to clipboard
Thank you so much for your reply! Do you have an example/ suggestion settings for a 5 x 7 print- specifically for Long Side & Resolution? Thank you!!
0 Upvote
Translate
More
Reply
Community guidelinesBe kind and respectful, give credit to the original source of content, and search for duplicates before posting. Learn more
LEGEND ,
/t5/lightroom-classic-discussions/how-do-i-increase-photo-resolution-for-printing/m-p/11270526#M193062 Jul 07, 2020 Jul 07, 2020
Copy link to clipboard
For a 5″ x 7″ print you must first apply a 5×7 Aspect Ratio Crop inside LR since most camera files are 2×3 aspect ratio. Then simply choose the Long Edge dimension, which is 7″ . Resolution is dependent on the traget printer, but most outside printing services require 300 dpi . What printer or service are you using? Output Sharpening is depends on the paper type with options for Glossy or Matte. Amount Standard works well for most prints. Lastly Color Space sRGB is required by most printing services. If using a printer attached to your computer than the target paper profle provided by the manufacturer should be used.
0 Upvote
Translate
More
Reply
Community guidelinesBe kind and respectful, give credit to the original source of content, and search for duplicates before posting. Learn more
LEGEND ,
/t5/lightroom-classic-discussions/how-do-i-increase-photo-resolution-for-printing/m-p/11270530#M193064 Jul 07, 2020 Jul 07, 2020
Copy link to clipboard
Lastly Color Space sRGB is required by most printing services.
So sad and so often true.
Author “Color Management for Photographers” & “Photoshop CC Color Management/pluralsight”
0 Upvote
Translate
More
Reply
Community guidelinesBe kind and respectful, give credit to the original source of content, and search for duplicates before posting. Learn more
[email protected] AUTHOR
Community Beginner ,/t5/lightroom-classic-discussions/how-do-i-increase-photo-resolution-for-printing/m-p/11270545#M193068 Jul 07, 2020 Jul 07, 2020
Copy link to clipboard
Wow thank you SO much for your help– I finally have a handle on these settings.
0 Upvote
Translate
More
Reply
Community guidelinesBe kind and respectful, give credit to the original source of content, and search for duplicates before posting. Learn more
[email protected] AUTHOR
Community Beginner ,/t5/lightroom-classic-discussions/how-do-i-increase-photo-resolution-for-printing/m-p/11270589#M193070 Jul 07, 2020 Jul 07, 2020
Copy link to clipboard
Sorry, one last question- what do you recommend for the Quality setting? I have mine set to 80%- is 100% optimal?
0 Upvote
Translate
More
Reply
Community guidelinesBe kind and respectful, give credit to the original source of content, and search for duplicates before posting. Learn more
LEGEND ,
/t5/lightroom-classic-discussions/how-do-i-increase-photo-resolution-for-printing/m-p/11270595#M193071 Jul 07, 2020 Jul 07, 2020
Copy link to clipboard
No, 100 isn’t optimal.
Author “Color Management for Photographers” & “Photoshop CC Color Management/pluralsight”
0 Upvote
Translate
More
Reply
Community guidelinesBe kind and respectful, give credit to the original source of content, and search for duplicates before posting. Learn more
LEGEND ,
/t5/lightroom-classic-discussions/how-do-i-increase-photo-resolution-for-printing/m-p/11270911#M193088 Jul 07, 2020 Jul 07, 2020
Copy link to clipboard
LATEST
At the link the thedigitaldog provided 80 (77-84) JPEG Quality setting does not exhibit compression artifacts in ANY of the samples provided. Using 100 setting will simply inflate the file size without providing any better “visual quality” in the image. It would be useful to use a 100 Quality Export is if you are plan on editing and resaving the JPEG file at a later date. Since LR uses non-destructive editing there’s no need to resave an exported file. Simply apply any new edits to the original file, re-export it to a new file copy, and delete the old one if not needed. In summary the 80 Quality setting is optimum from the standpoint of saving storage space and reducing upload times.
0 Upvote
Translate
More
Reply
Community guidelinesBe kind and respectful, give credit to the original source of content, and search for duplicates before posting. Learn more
LEGEND ,
/t5/lightroom-classic-discussions/how-do-i-increase-photo-resolution-for-printing/m-p/11268015#M192976 Jul 06, 2020 Jul 06, 2020
Copy link to clipboard
Work in total pixels, the resoution tag (300PPI not DPI) is really meaninless.
- Language:


