Ivy and Moss Painting Tutorial, Yo’!
Alright alright, check this out. So I’ve been commissioned to do this painting for a friend of mine. He wants a Zelda-themed painting, 20″x 20″ on canvas. Zelda painting?! I couldn’t pass that up! My plan was to construct a Drew Struzan-type layout, which I know, is pretty lofty. He’s painted movie posters for Star Wars, Indiana Jones, Back To The Future… freaking Goonies for cryin’ out loud! His paintings are some next-level, shhhtuff, but I figure that although his paintings would be the inspiration, I would put my own personality in to this masterpiece
My only problem was (well, one of many) that I needed to know a good technique for simply painting a massive amount of ivy, without having to paint the ivy in one at a time. Kinda like how Bob Ross paints his happy little trees with just a dab of his fan brush. So I scoured the internet looking for tutorials & I came up with nothing! Sure there were tutorials on how to paint like, five or six on a grapevine, but I’m talking ’bout a whole dark forest of them. A canopy of them, tree-covered trunks of them. So, I thought I’d post this post for whoever needs to paint a grip of ivy in the future, & moss, for that matter.
I’m using acrylic paints & I’m starting to realize that acrylics have a shelf-life. Or maybe it’s that I’m using cheap ones, I don’t know. They’re the Liquitex Basic brand. Make sure they haven’t been sitting around for forever, being unused! You need that flowiness action, not that sticky goop action!
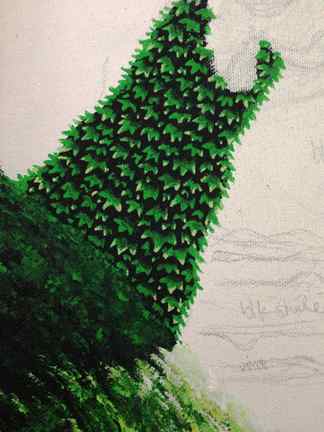
I wanted to paint this ivy-choked tree trunk in the background. The composition as a whole takes place in a dark forest, with brilliant rays of light shooting out from behind, so the tree is going to be backlit. I mixed a really dark green with a little black & painted the tree trunk this. Since I used acrylic, I didn’t have to wait long for it to dry. Then I went in with an ultra-fine point paint brush, I’m talkin’ the finest-point paintbrush you can find, & starting with the tip-end of the ivy, paint the points of the ivy, going “back” towards where the ivy would be closer to the tree trunk. At this point, there should be less paint on your brush, thus letting the drk green/blk of the tree trunk show through. This will give the effect that the ivy is receding into the dark shadows of the tree. I used a light green for the ivy, which gives it some good contrast against the dark tree trunk, but doesn’t look unnaturally bright, or light green. I’m not going to lie, as they say… this took… a long time. Well, I was also distracted with Monday Night Football, & food, & my back hurting, but it took a good couple hours, which fly by, by the way. Also, I’m kind of a perfectionist, so I was going slower than I should have.
Finally, I used a tiny bit of yellow-green paint to give touches of highlights to the ends of some of the ivy, giving it further depth. Once I paint the surrounding rays of light, I’ll have to go in and adjust the lighting of the tree, by darkening the center & lighting up the sides.
So you see, even though I didn’t find a quick-dab solution to give the appearance of ivy, painting fading ivy tips works pretty well, & it’s kinda fun, so the time passes by too! I plan to paint the whole top portion of the canvas with an ivy canopy. We’ll see how that goes…
MOSS
I wanted the foreground to feature this mossy… mound. I just went in with my flat brush, considered where the light source was coming from, & dabbed the moss in, using gradients of green. I added shadow, where the tree trunk would be blocking the ground. All this took only a few minutes. Not sure that I pulled it off, but I’ll fill in the rest of the painting, & then see if it looks more like moss, considering its’ forest surroundings.
Thus concludes the ivy and moss painting tutorial, hurray! I’ll post in the near future, my progress & completion of my Drew Struzan inspired, Legend of Zelda painting.
How to Make a Moss Table: 10 Steps

A moss table adds a touch of nature and eco-friendliness to your indoor living space. It is an artistic and functional piece of furniture that can be customized to suit your tastes and preferences. Follow these 10 steps to create your very own moss table.
1. Gather materials: To make a moss table, you will need a wooden table frame, clear acrylic sheet, wood glue, wood screws, drill, silicone sealant, sandpaper, moisture-resistant paint or wood stain, preserved moss (different types and color variations), tweezers and gloves.
2. Prepare the table frame: Sand the wooden table frame using sandpaper to remove any rough edges or uneven surfaces. Apply moisture-resistant paint or wood stain according to the manufacturer’s instructions and allow it to dry completely.
3. Measure and cut the acrylic sheet: Measure the dimensions of the tabletop area and cut the acrylic sheet using those measurements. Make sure that it fits securely in the table’s recessed area.
4. Create a moss bed: Fill the recessed area of the tabletop with a thin layer of silicone sealant using a caulking gun or spreader. Spread it evenly across the surface, ensuring all corners are covered.
5. Add preserved moss: Wearing gloves, use tweezers to place different types of preserved moss onto the silicone layer in your desired arrangement. Be creative with patterns and color combinations for a unique look.
6. Secure moss in place: Gently press down on the moss with your fingers to ensure it adheres properly to the silicone sealant layer. Remove any excess moss particles or trim overhanging edges if necessary.
7. Attach acrylic sheet: Run a bead of wood glue along the perimeter of the tabletop recessed area where the acrylic will sit. Carefully place the acrylic sheet onto the glue in such a way that its edges align with those of the area. Press down gently to ensure a strong bond.
8. Fasten the acrylic sheet: Using the drill and wood screws, fasten the acrylic sheet to the table frame through the pre-drilled holes. Make sure the screws are tightened securely to create an airtight seal around the moss area.
9. Clean up: Wipe away any excess glue or silicone sealant using a damp cloth and clean any fingerprints from the acrylic surface with an appropriate cleaner.
10. Care for your moss table: Keep your moss table out of direct sunlight and maintain a stable room temperature. To keep the preserved moss looking fresh, occasionally mist it with water using a spray bottle.
With these 10 steps, you will have created a unique and beautiful moss table that brings tranquility and inspiration into your living space. Enjoy your new eco-friendly conversation starter!


