Credits // Author and Photography: Mandi Johnson . Photos edited with Stella of the Signature Collectio n and Pearl from the Fresh Collection .
Easy No-Carve Pumpkin Ideas

You can keep your spooky ghosts and ghoulish goblins— give me all the pumpkins! Okay, okay… Honestly though, as much as I hate to say it— I’m really not the biggest fan of the pumpkin flavors that are so popular this season. But I think I can redeem myself in a world of squash-crazed bloggers with my utter adoration of the pumpkin itself. I mean, just check out my dining room in the image below! If that’s not love, I don’t know what is.
When I was a kid, the only time I was allowed to use a Sharpie marker was at pumpkin carving time. After scooping out the insides and separating the seeds from the orange goo, my brother and I would, with great exhilaration, wield our dangerously permanent markers and carefully draw the designs we wanted on our pumpkins. Meanwhile, Mom would make hot chocolate as Dad checked on the pumpkin seeds roasting in the oven. It was a special time. I think I usually just drew out pretty basic jack-o’-lantern designs, and then Dad would take over with the carving knife to make my designs a reality.
These days, pumpkin carving is still fun, but pumpkin decorating is a lot easier. Plus, pumpkins last a lot longer when they’re not carved. I always seem to let jack-o’-lanterns turn mushy before getting rid of them (because who likes throwing away pumpkins? No one!). So this year I decided to skip the carving all together. I invited my (now adult) brother and his girlfriend over to help us decorate our pumpkin loot, and we had so much fun! I put out baskets full of paint and supplies, and we had a grand ol’ time listening to Ella Fitzgerald, sipping wine, eating cookies, and decorating a pumpkin or two.
Check out the easy no-carve designs we did below!
PAINTED PUMPKINS
My favorite technique for pumpkin decorating is definitely a simple paint job. When arranged together on a door stoop or mantel, a variety of paint techniques can create a visually stunning display.
Gold Leaf Paint // Painting a pumpkin with gold leaf paint creates a bit of glamour. Glamorous pumpkins? They’re not just for Cinderella stories, folks. Phil free-hand painted the top left pumpkin using the natural vertical lines of the pumpkin as his guide.
Bold Stripes & Puffy Paint // The pumpkin next to the gold one was gloriously squatty and warty. All it needed was some white paint to make it over. I used larger white stripes to contrast the gold-painted pumpkin to the left, and accented those stripes with white puffy paint. It made an interesting, sophisticated-looking design without being complicated to paint.


Puffy Paint Lace // Puffy paint was a lot of fun to work with when decorating our pumpkins. I easily drew a lace-like pattern with white puffy paint on this light colored pumpkin above left. The paint did take a few hours to dry, though, so be careful when moving it! I smudged mine a bit.
Painted House Numbers // Rather than attempting to free-hand numbers onto a pumpkin, I printed out large numbers, cut them out from the paper, and traced around them onto the pumpkin with a black marker. Then I filled it in with black paint. Pretty easy! It will look great on my brother’s front stoop.


Sponge Painted Pumpkins // This little guy got a nice coat of white paint (brushed on acrylic craft paint), including the stem. Then dots were created by dipping a sponge paint dabber in gold leaf paint. The smaller dots were made with a pencil eraser! Then I pushed in brads to accent the larger dots. To give detail to the stem, it was given a light brush coat of gold paint too.
Stenciled Pumpkins // I love the intricate, yet graphic look that stenciling gives. I bought a set of craft stencils which worked beautifully on the pumpkins. They are already sticky, and can even stretch to conform to the curve of the pumpkin. Perfect! The possibilities are endless when it comes to stenciling. You can also do these no-carve pumpkin tattoos as well!
EMBELLISHED PUMPKINS
Embellished pumpkins are easy to decorate, and because there’s no paint involved, they can be easily altered according to your whims. I think all of these pumpkins coordinate nicely and would work beautifully to create a long tablescape for a dinner party.
Floral Dots // Pop the head off some plastic daisies or mums to make quirky flower-dotted pumpkins. I adhered my flowers with glue dots, but you could use straight pins instead.
Twine & Rope Designs // Nailheads secure twine or rope to give graphic detail to these pumpkins. This design looks complex, but it was so quick and easy to achieve! Just wrap the twine around the first nailhead and push it into place to get started. Leave the other nailheads loose until the design is complete, then push them into place.
Nailheads // Pushing nailheads into the skin of a pumpkin is so quick and easy. You can do something as simple as random dots or make patterns with the nailhead placements. Depending on how many nailheads you want to use, this look works better with small and medium pumpkins.
Garlands // Wrapping a fall garland around a pumpkin is also very simple, but creates an elegant, whimsical look that makes a beautiful table centerpiece. I used straight pins to secure the garlands, and then bent the wire twigs to make it look a bit more natural and carefree.


Decoupage Leaves // Decoupaging pumpkins can be difficult because of its spherical shape, but I was determined to decorate this squatty pumpkin with leaves if it was the last thing I did. I found the trick was to work with the natural way the leaf bends and curves, and to use straight pins to hold the leaf in place as you brush a top coat of Mod Podge on it. As the Mod Podge began to set up, I brushed more on top of it to really get the leaves to lay flat.
Corn Husks // Want a more naturally looking striped pumpkin? Corn husks are the way to go. Unless you can find long corn husks, this look works best with smaller pumpkins. I found my corn husks in the Mexican food aisle of my local grocery store, then cut them to size, and used Mod Podge and brads to hold them in place.
How festive do these guys look? I think they look magical! The mix of embellished, painted, and gold leafed pumpkins is such a fun way to decorate for the season.
I love the way all of the painted pumpkins have turned my home into a wonderland of autumn, but my absolute favorite? Why, that would have to be the gold painted pumpkin above. Don’t you think Phil did a good job with that one? Which one’s your favorite? –Mandi
Rolled Paper Flower Pumpkin
Make your own Rolled Paper Flower Pumpkin for Halloween using inexpensive and simple craft materials.

Hello there! I can’t believe we are already into the month of October and Halloween is just around the corner. This year I decided to make cute crafts for Halloween. Over the weekend I made this Rolled Paper Flower Pumpkin and I love how it turned out. This little paper pumpkin was a labor of love and the black looks perfect for Halloween!

Supplies (affiliate links):
- 6 inch foam ball
- 12 x 12 inch black cardstock (2 packages)
- White pen
- Scissors
- Hot glue gun and glue sticks
- Black acrylic paint
- Paint brush
- Wine cork (optional)
- Ribbon (optional)
Instructions:

Start by painting the foam ball with one thin coat of black acrylic paint and let it dry completely. I really like this smooth foam ball because the smooth surface is easy to paint and the paint dries quickly.

Cut the 12 x 12 inch cardstock into 4 equal pieces. For the black cardstock, I used a white gel pen to mark a spiral circle in the center of each cut piece of cardstock. The white shows up on the black cardstock and I like to see the white spirals in the paper flowers. It gives the flower depth. If you use a different color of cardstock, you can use just a regular pen or pencil.

Next, use a pair of scissors to cut out the spiral circle. Don’t worry if you don’t follow the lines or your edges are rough. The paper flowers will turn out great! At the base of the paper flower, use a hot glue gun to to glue the flower together. You can make the flowers tight, loose, or a mixture of both. It just depends on what you like.

Then use the hot glue gun to glue the flower to the foam ball. Try to glue the flowers close together so you can’t see the foam ball. For details photos, check out my tutorial here. Cover the entire foam ball with rolled paper flowers.

Finally, I used a wine cork for the stem and hot glued it to the top of the rolled paper flower pumpkin. I made a bow to complete the look. This step is optional but highly recommended. I mean, look how cute it is!
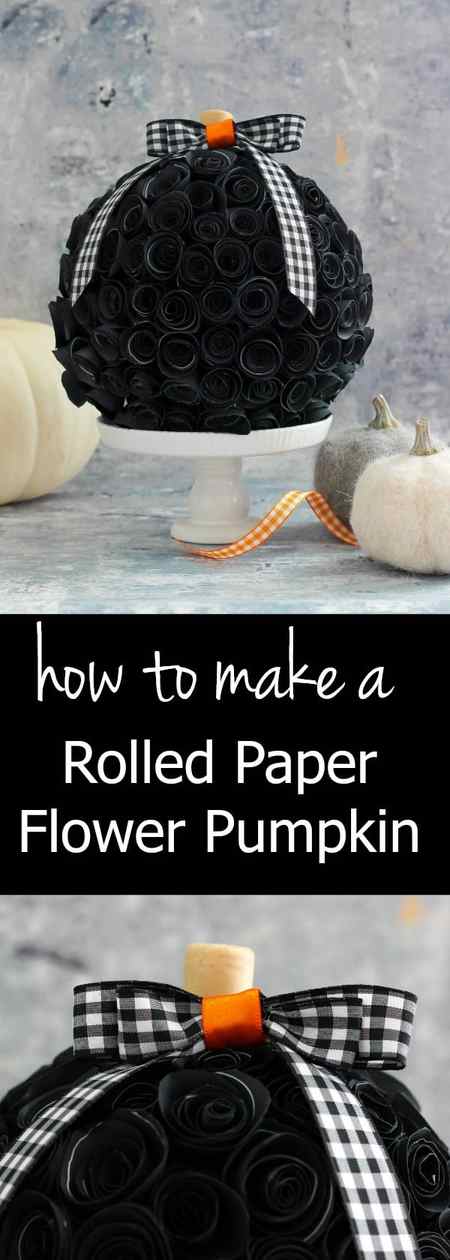
This rolled paper flower pumpkin craft does take some time, so I like to put on my favorite Pandora station (The Lumineers) and listen to music while I craft or you could turn on your favorite movie. How cute is this pumpkin for Halloween?!
Funky Pumpkin Decorating
It’s that time of the year again – pumpkin decorating time! However, this year, why not put a spin on your traditional funky carving by putting the knife away and exploring the potential in paint?
Painting pumpkins not only looks great, but they also last longer and are a safe way for children or teens to complete their own Halloween design.

Step 1: Select your Pumpkin
Before heading to the store, take some time to think about your future pumpkin creation so that you can select the shape and size that best suits your design. Try to avoid any ridges or bumps (unless this is part of your décor), as they will be a bit more difficult to paint over. Instead, choose pumpkins that are smooth to the touch.
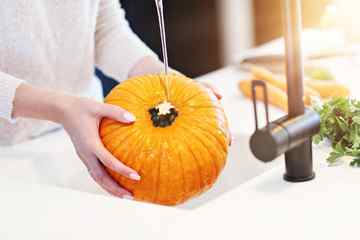
Step 2: Prepare the Surface
It’s time to clean your pumpkin. For this step, take out a small bucket, a little bit of dish soap, a sponge, and a small brush (to get into the crevices). Begin by removing all of the dirt from the surface so that the paint does not stick to the grit. Next, rinse the pumpkin well and allow it to dry.

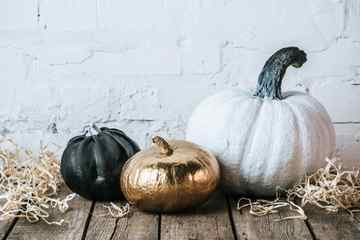
Step 3: Choose your Base Colour
The pumpkin has become your new canvas, which means you don’t have to stick to orange. In fact, you can quickly transform the colour of your pumpkin with a little bit of spray paint. The benefit of using spray paint is that it will stand up to the rain, sleet, and even snow, while completely covering the original colour of your pumpkin.
If spraying outdoors, make sure to choose a sunny day to allow the paint to dry. For best results, apply at least two applications.
Step 4: Choose your Pumpkin Style
Social media is jam-packed with examples of incredible pumpkin transformations. The beauty of this fall trend is that anything goes, so choose the style that best suits your personality and fall décor.
Here are just a few of our favourites:
A Touch of Class
It may seem strange to describe a pumpkin design as something elegant; however, a few simple techniques will transform that pumpkin into a beautiful showpiece.
- This design begins with a can of spray paint. Choose from classic white, metallics or iridescent paint to add a bit of glamour to your outdoor décor.
- This pumpkin can either be left as is, grouped with a few other pumpkins, or elevated with the addition of a bit of décor.
- Ramp it up a notch, by adhering small gems in a paisley or swirl pattern to add sparkle or pull out the mod podge and decoupage your pumpkin with your favourite wallpaper or scrapbook designs.

Sensational Stencils
Stencils are a quick and easy way to create a unique design on your favourite squash. From monogrammed pumpkins to unique patterns, stencils are a simple way to create a stunning centre piece.
- Paint the foundation: white and pastels provide the perfect base for a design to pop.
- Securely attach the stencil.
- Use a sponge brush and cover the stenciled area with acrylic paint.
- Allow to dry.
- Gently peel off the stencil and show off your finished product.
Express your Inner Picasso
Who says splatter paint needs to be confined to a canvas? This year, why not take your creativity to an entirely new level with a splash of paint.
Warning: this craft activity can become a little messy
- For best results choose between three to five colours of paint then prepare your splatter paint by mixing standard acrylic paint with a few drops of water.
- Dip a standard paintbrush into the paint.
- Flick the paint onto the pumpkin.
- Repeat until you achieve your desired effect.
Absolutely Marbleous: The Art of Paint Pouring
Have you fallen in love with the marbled look? Then it’s time to try out Pumpkin Paint Pouring. This beautiful effect can be done with only a few simple tools, including acrylic paint, Liquitex Pouring Medium, and a bit of patience.
- Mix two to three colours of acrylic paint with Liquitex Pouring Medium. Metallic and iridescent paint are beautiful options to showcase this effect.
- Slowly blend the colours into a cup. This will provide you with a sneak peek of the marbled effect that will be displayed on your pumpkin.
- Patiently pour the paint on top of the pumpkin. The slower, the better, as this will allow you to control where the paint will fall onto the pumpkin.
- Continue the process until the pumpkin is fully covered.
- Finish your design with a spray of acrylic paint sealer.

Go Vinyl
Calling all Cricut lovers: it’s time to place your favourite design on your pumpkin. Using outdoor vinyl is a great way to transform your pumpkin into a picture-perfect design. This technique can be used in a variety of ways including, showcasing your favourite phrase, a unique pattern, a Jack-o’-lantern face or a spooky image.
- Use a stencil or Cricut to trace and cut your desired shape.
- Peel and stick onto the surface.
- Continue until your design is complete.
This fall, discover your inner pumpkin artist and create a unique design with the power of paint. From refined designs with stencils to abstract showpieces – the only rule with creating these funky pumpkin masterpieces is to have fun!


