There’s so many ways you can use leaves in your projects. My favorite use for these is working them in to mixed media art, journal pages or cards. Because the leaves can be bent, they can also be added to dimensional objects such as vases or candle holders.
How to Press and Preserve Fall Leaves
Fall is one of my favorite times of year. It’s the perfect time for pressing and preserving fall leaves to add to your journal and creative projects. There are so many beautiful colors and shapes from fall leaves, they add a beautiful, organic touch to any project!
The Problem
The problem with fall leaves is how to prevent them from cracking, crumbling, and disintegrating on your project. It’s discouraging to create a beautiful project with leaves and have the leaves crumble and crack off your page.
Using these simple techniques below will help you press and preserve your fall leaves. These techniques are easy, require very little materials and will give you good results every time!
Hop-A-Long Studio is reader-supported. When you buy through links on our site, we may earn an affiliate commission at no cost to you. Learn more.

There are so many places to collect leaves. I love taking leaves from my garden and as I walk in parks around Calgary. I also love taking leaves from the trees at the Calgary Zoo. They have some out of zone and uncommon trees, so in the fall I make a point of visiting the zoo to collect a few leaves.
When collecting leaves, make sure that the leaf is still pliable and bendy. If it’s already starting to crack, it’s not going to be a good choice for drying. I try to find the fresh leaves that have just fallen off a tree. If you want to pick a few leaves off a tree, select leaves that come off easily in your hand. You want to make sure that you are gentle so that you don’t damage the tree.
Pressing Fall Leaves

The easiest ways to press fall leaves is in the pages of a sketch book or art journal. I generally carry a sketchbook with me in the fall when I’m walking. When I come across a beautiful leaf, I slip it in between the pages of my book. As the books I tend to use are case-bound journals, they will keep the leaves in place easily and help them to be pressed flat.
When you get home, if you feel like the book isn’t pressing the leaves enough, add another book on top to add weight. I tend to forget that I’ve slipped leaves into the pages of my book, so when I go to create, I often have a happy surprise of pressed leaves to use in my next project.
Choosing the Right Book

The key to make this work is making sure that you’re using a journal with heavy weight journaling paper and a case-bound (stitched and glued) book. If you tried this with a spiral notebook, you may find that the leaves will move around more and could possibly fall out of the book.
You can also just add leaves between 2 sheets of paper and add a book on top to add weight while they dry. I like using sketchbooks as my space is limited and I don’t have the space to leave out pressed leaves for weeks to let them dry.
Are the Leaves Dry?

You want to make sure that the leaves are fully dry and pressed. You can tell when they are fully dry because they are thin, fragile and won’t bend at all. They will have no more moisture in the leaves.
As I live in a semi-arid climate with low humidity, this usually only takes a few weeks. The humidity in your environment will directly affect how long the leaves take to dry.
Sealing and Preserving Fall Leaves

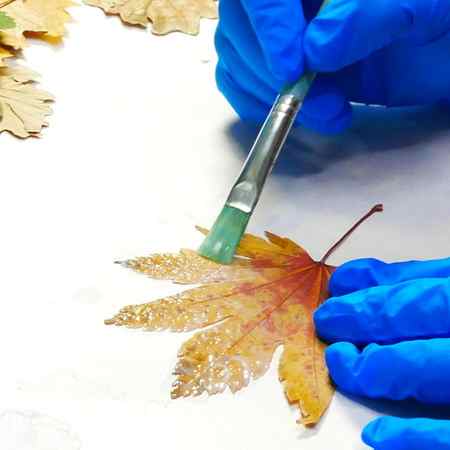
The easiest way to preserve your dried leaves is to use matte medium. Matte medium is a liquid acrylic medium that dries clear which makes it perfect for delicate leaves.
Using a ½” brush, add matte medium gently to the surface of the leaf in an even layer. You will notice that it will follow the bumps and textures of the leaf. So not only does it protect the leaves, but it also keeps the texture of the leaf including all the high and low points from the stems and veins.
Add a thin layer of matte medium to the leaf. Once it’s dry, turn it over and coat the other side of the leaf. If you want it to be stronger, continue to add additional thin layers of matte medium until the leaf is as strong as you want it. You should be able to easily bend the leaf without it cracking.
Other Mediums for Preserving Leaves

You can also try using a Golden Regular Gel Medium Semi-Gloss or Modge Podge on your leaves, but you do need to be extremely gentle. Any delicate and thin leaves will tend to break due to the thickness of the gel. Regular gel medium will leave obvious brush strokes and because of the thickness of the medium, it will cover up some of the leaf texture.
I prefer using matte medium as it is more liquid and easier to work with. Adding several thin layers will prevent damaging the leaves and will give a smoother coat of medium to the surface.
Landscape Painting: Watercolor Unleashed

✓ Showcase your talent and win big in Artists Network prestigious art competitions! Discover competitions in a variety of media and enter for your chance to win cash prizes, publication in leading art magazines, global exposure, and rewards for your hard work. Plus, gain valuable feedback from renowned jurors. Let your passion shine through – enter an art competition today!

Summer might just be starting for many of us, but when it comes to painting landscapes, there’s no time like the present for painting fall foliage. When summer temperatures hit their highs, there will be days when I’ll be dreaming of crisp autumn leaves and long hikes through the woods without danger of heatstroke. For all the fun of sitting poolside (or even better, beachside), I like the anticipation of cooler temperatures.
For those days when you want autumn leaves instead of green grass, paint a fall landscape in watercolor with Julie Gilbert Pollard! In Painting the Autumn Landscape: Watercolor Unleashed, she explores the painting techniques for creating a stunning landscape that sparkles with color. From underpainting to final details, Julie explores each step of the landscape painting process, demonstrating how to paint wet-into-wet, edge work, splattering, and how to build color and value for a beautiful composition that stays loose, without losing control.
Preview Painting the Autumn Landscape: Watercolor Unleashed now to enjoy painting with abandon as you block in a color underpainting, paint wet-into-wet, with big shapes and playful color, and then head over to ArtistsNetwork.tv to stream the full video, materials lists and reference photos, and more! You can also get it on DVD or download it at NorthLightShop.com!
Not quite ready for fall? Take advantage of the weather to do some plein air and all your landscape painting needs with these free art lessons!
Autumn or Fall Warm Colors in a Flip Cup
After so much painting with blues and greens recently or really bright primary colors, I fancied a change. I picked a much warmer and muted color palette for this one. My second ever canvas. No crazy experiments, just some painting for fun today.

I used:
- Lemon Yellow
- Orange
- Warm Red
- Burnt Umber
All of the paints were pre-mixed into my squeezy bottles this time. I love using these bottles. SO easy to mix up the paint in all advance and then it’s ready to go when I get time to paint. It’s accurate so if I want to create swipes I can easily apply the paint exactly where I want it, or squeeze the bottle hard to create a jet of paint into my cup and get those colors mixing.
I used my usual mix recipe of:
- 1 tbsp of paint
- 1/2 tbsp of Floetrol
- approx 1tsp of water as needed
- few drops silicone oil
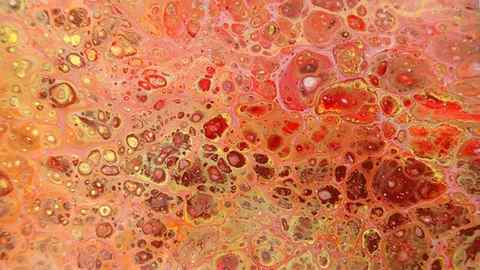
The only different thing I try today, other than different colors, is a double flip. I flip the cup, then I flip it back again, then back facing down. In hindsight it was probably a bit too much and would explain why the painting came out so very orange. I overmixed the red and the yellow paints to create even more orange, when it may have looked better if they had stayed more ‘pure’ to the original colors.
Anyway, take a look at how I got on today
What a lovely result. It does feel warm, almost comforting to look at. Subtle, not so much in your face as some of my earlier pours. I’m very happy with it.
Check out the slideshow below for more photos, both wet and dry, and closes ups of the details. This one is so calming.


After being told in high school that she was so bad at art that she should switch to another subject, Deby didn’t paint again for 35 years. Then a stroke released a new wave of creativity and she began exploring with dot painting, abstract and eventually acrylic pouring, and at last the joy of working with color returned. You don’t need ‘talent’ to be an acrylic pouring artist – just enthusiasm, some basic instruction, and a willingness to try, fail and try again. Paint along with her and learn from her many mistakes, and you’ll soon make great art together.


