Easy Cherry Blossom Nail Art: Step by Step Tutorial Reviewed by Madhubani on 17:40 Rating: 5
Beautiful Cherry Blossom Tree Branch Painting Tutorial For Kids
This article provides a fun and creative painting idea for kids using a cherry blossom tree branch. Learn how to make this beautiful and unique piece of art with just a few supplies. Perfect for parties, classrooms, and more!
Is spring season your favorite time of the year? If yes then this artwork is the perfect fit for you to make! These cherry blossom flowers will bring the vibe of the season to your home! Cherry blossoms are literally the most beautiful flowers created by nature! You can also paint them with the help of this tutorial and show off to everyone your art skills! This painting is easy-to-make and even a beginner can make it without any help! To make this painting all you will need is the very basic paint supplies and you will be able to create this artwork in no time! Grab them and let’s get started!
Easy Cherry Blossom Tree Branch Painting For Kids
- White Circular Paper Sheet
- Colorful Paints (Purple, Pink, Green, and Brown)
- Rounded Paintbrush
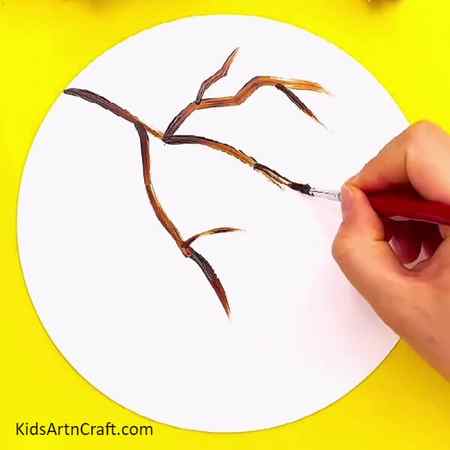
Step 1: Making Tree Branches
To begin this painting, take a white circular paper sheet and a thin rounded paintbrush. Dip the paintbrush into brown paint and make irregular tree branches coming from the left side of the paper.
Step 2: Completing Making Branches

Complete making the branches of the tree spread till the end of the paper.
Step 3: Making A Flower Petal

Dip the paintbrush into pink paint and make a small oval-shaped petal at the end of a branch by gently pressing the paintbrush over the paper.
Step 4: Making A Cherry Blossom Flower

Following the same above-mentioned technique, make 4 more petals in a circle to form a cherry blossom flower.
Step 5: Making More Flowers

Make more irregular-shaped flowers of different sizes over the branches.
Step 6: Making The Center Of The Flowers

Dip a cotton earbud into purple paint and dab it over the middle of the flowers to make the center of them.
Step 7: Making Leaves

Dip the paintbrush into green paint and make random small strokes over the branches to make them look like leaves.
Your Cherry Blossom Flower Painting Is Ready!

Take a minute to appreciate your amazing creation!
These cherry blossom flowers will bring the spring season right into the room where this painting is hanged upon! This cherry blossom painting was easy to make and the kids will love to admire the beauty of nature by making it! You can also make this painting into a giant one and decorate it in your drawing room, this idea will look absolutely stunning, try it out!
Follow us on Youtube for art and craft tutorials and much more.
More Articles from Kids Art & Craft
- DIY Monster Bookmarks for Kids
- DIY Step by Step Finger Puppet Craft for Kids
- DIY Easy Paper Strawberry Tutorial For Kids
- How To Make Orange Peels caterpillar craft
- DIY Paper Snowflakes Step by Step Tutorials for Kids
Related posts:
- Stamping Flower Art Ideas
- Cute Bunny & Flower Painting Art
- Apple Stamping Art Ideas for Kids
- Silhouette Painting with Watercolors
- Painting Hacks With Bubble Wrap
- Handmade Rainbow Painted Rock Ideas
- Silhouette Landscape Paintings
- Salt Painting Activities for Kids
Easy Cherry Blossom Nail Art: Step by Step Tutorial
The cherry blossom tree is truly a sight to behold, especially when it is in full riotous bloom. Love those small pinkish-hued flowers. So yesterday I tried doing a cherry blossom nail art inspired by it’s beauty. This is easy and looking very pretty.

Learn how to do cherry blossom nails with our step-by-step tutorial.
Things I used for t his nail art:- :-

- Nail polishes ( A hot pink, a pale/ French pink, dark brown, a clear top coat). I didn’t have brown nail polish, so I mixed up red and black.
- Brushes
- Nail paint remover
Steps:-

- Paint the index and little finger nails with the hot pink nail color and the rest with French pink. Let it dry completely.
- Dip your brush in a brown nail polish and start drawing branches on the nails you painted light pink. Make sure the lines aren’t too thick. Practice on paper to nail the brush control. Let dry.
- I mixed a little bit of the dark pink to the light pink and mixed together well. It should be a few shades darker than the light pink background you have on your nails. Now taking this pink in a brush I made little tiny dots clustered together to form flowers. Draw a few random tiny dots.
- Now taking the hot pink color, add a few more flowers to make the nail art appear brighter. Draw a few tiny dots here and there like before.
- Draw the centre of flowers with the light pink color.
- I just added a few light strokes of light pink and purple on the “hot pink” nails to give a texture. Well, this is completely optional.
So that’s it. You can apply a top coat if you want. I personally like to keep them “non-shinny”.


Easy Cherry Blossom Nail Art: Step by Step Tutorial Reviewed by Madhubani on 17:40 Rating: 5
Tags : Easy Cherry Blossom Nail Art floral nail art Nail Art spring nail art step by step tutorial
SHARE THIS
You Might Also Like
2 comments:
I love it 🙂 Beauty nails Reply Delete
thanks a ton dear 🙂 Delete
Hello, pour in your wonderful thoughts; would love to hear from you.
Subscribe to: Post Comments ( Atom )
About Me

Hello, I am Madhubani Chakraborty; a language expert by profession and blogger by sheer passion. Here I share my tidbits on fashion, beauty, my adventures with events I go to, yummy recipes, secret eat outs, as well as stories of beautiful brides, my DIY projects and recipes. all in the hopes of providing help to people of all ages. I hope that in my own little way I can somehow help, inspire and empower others.


