Once the ice cubes are frozen, take them outside with some paper and get painting.
Ice Painting with Ice Cubes

Ice Painting with Ice Cubes is a favorite summer activity at our house. Both of my younger kids love creating masterpieces with this simple paint technique. Ice paint is easy to make and fun to play with. I actually have my kids help me make the paints as well, so it is something they can do start to finish. Plus it only takes two household ingredients to make!

I’ve even brought Ice Paints to my daughters classroom and all of the kids were so excited to go home and show their parents how to make ice paints! Their very favorite way to paint with them was the straw blowing method. Read on to learn how to make your own set.
How to Paint with Ice

Supplies:
Food Coloring
Water
Ice Cube Tray
Plastic Wrap
Toothpicks
Directions:

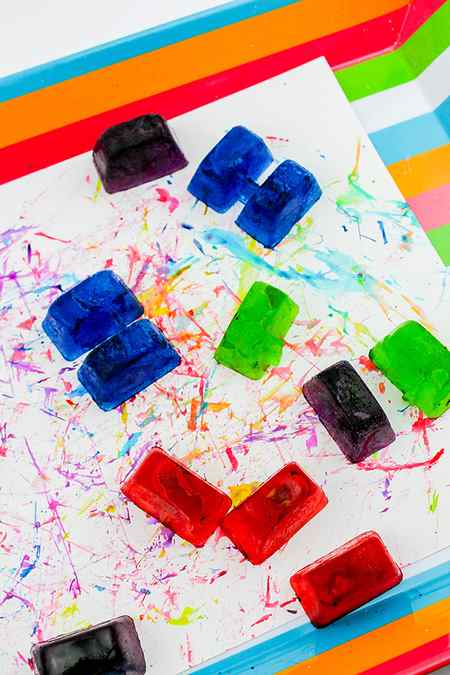
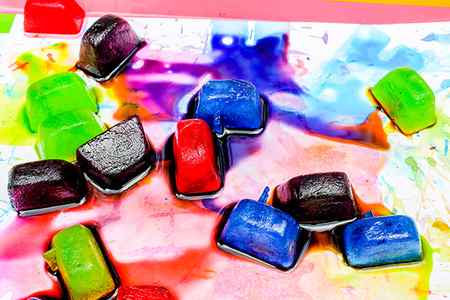
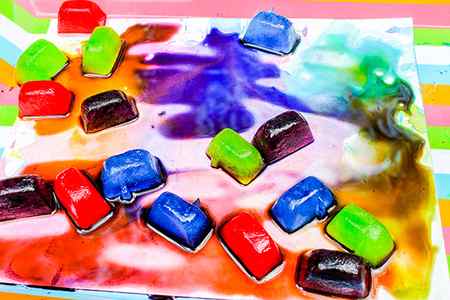
Add a couple of drops of food coloring to each section of the ice cube tray. Remember to mix the colors to get even more fun colors to paint with (add a drop of blue and a drop of red to make purple, etc!).

Add water to the tray. I use a squirt bottle so that I can make sure to control the water flow so that my colors don’t get “muddy”.

Cover the tray with plastic wrap and insert toothpicks (oops! As you can see, I ran out of toothpicks… could it be to the fact that my kids found them and decided to play a game of hide the toothpicks? Yea, we were finding toothpicks around the house for days!)
Place the tray in the freezer until the ice is frozen through.
TIME TO PAINT!

Once the ice cubes are frozen, take them outside with some paper and get painting.

You can paint by holding onto the toothpick and drawing with the ice cube or you can let the paint drip onto the paper and use a straw to blow the paint around the paper. My youngest also likes to use her fingers.

The warmer the day, the faster the ice paints melt, so keep that in mind! If you have any ice left over after the child is done painting just put it back into the freezer to use on another day! Best part? The color stays vivid even as it dries. A lot of homemade paints seem to fade as they dry, but these don’t!
Originally shared on the Funner in the Summer Series at 30 Handmade Days
Ice Cube Painting: Sensory Activity for Toddlers & Preschoolers
Ice cube painting is a super sensory play activity for toddlers and preschoolers on a warm, sunny day. It’s cold. colorful and completely taste-safe too!

And if you put a piece of poster board, white paper or paper towel underneath your sensory play, you might just discover a sweet painted surprise at the end. This almost accidental artwork is a lovely keepsake or can be used to create a card for a friend or family member.
Like we did with our rainbow magic milk experiment, we’ve used neon colors for this ice cube painting activity, which resulted in really bright, beautiful colored ice cubes – so cool…no pun intended! And if you have preschooleres or older children as well, try out these glitter ice painting sticks at the same time as your little ones explore.
Ice Cube Painting & Sensory Play
You will need:
- Ice cube tray
- Water
- Neon food coloring
- Large tray
- White poster board, paper or kitchen towel/paper towel

Preparation:
1. First you will need to prepare your ice cubes. Start by pouring water into the ice tray. Do not overfill the individual sections of the tray or the individual colors may run into other sections.

2. Add 2-3 drops of liquid food coloring to each section of the ice cube tray.
3. Place the tray in the freezer and leave until frozen completely.
Tip: If you use complementary colors such as red, blue and purple or pink, or yellow, blue and green, you are less likely to end up with a brown splodge at the end.
To play:
1. Place a sheet of poster board, paper or kitchen towel into the large tray.
If you don’t have a tray you can use the lid of a plastic storage bin or a short sided bin, like that you might use for a sensory bin. To help minimize any mess, take the tray outside for play.

2. Empty the frozen ice into the tray.

3. Allow your child to explore the ice cubes. The ice will start to melt and leave colors on the poster board.

The neon food colouring is especially bright and colourful as the ice melts.

As they play, you might like to ask your child some questions like;
- How does the ice feel? What does it remind them of?
- What colours can they see?
- What can they see happening to the ice as they play?
- Why do they think the ice is melting?
- What could they do to make the ice melt more slowly, or more quickly?

4. When your child is finished playing with the ice, pour the melted ice water into the sink. Blot the poster board with kitchen paper/paper towel to remove excess liquid.

5. Hang the art work to dry.

For more sensory fun in the sun be sure to check out these ideas…


Christie Burnett is a teacher, presenter, writer and the mother of two. She created Childhood 101 as a place for teachers and parents to access engaging, high quality learning ideas.
Previous post: Number Facts Grid Game: Counting, Addition, Multiplication & More!
Next post: Rainbow Outdoor Scavenger Hunt
Read the comments or scroll down to add your own:
- Mark Man says July 3, 2020 at 8:51 PM
These are amazing activities for kids, I will try with my kids. Your blog is amazing.
Amazing ideas and i will try with my chickadees! Love it
Thanks, a great help with my studies! God bless you.
Search
Tips & Resources

Latest
10 STEM Coding Toys for Kids Who Love to Code
Are you, like me, a bit overwhelmed by the explosion of STEM toys out there? … [Read More. ]