I made this stenciled ornament using the Testors Marbling Medium, with the Testors Craft paint in Snow White Metallic and Gold Rush Glitter Burst. I made the stenciled letter with the Testors Intense Glitter paint.
Elegant DIY Painted Christmas Ornaments the Easy Way

The Christmas season is near and every person celebrating this year is popping up trees and getting ready for holiday takeover.
Of all the Christmas decor that goes up at this time of year, Christmas tree decorations are my absolute favorite. Each year I change up our theme and our tree. Actually, we have an embarrassing amount of trees around the house. Including one for every bedroom!

This year the color scheme for my own tree is neutral. Instead of traditional red, I opted for varying shades of green, white, gold and charcoal.
Repurposing your own ornaments is definitely a preferred method for decorating. But sometimes it’s fun to purchase a set of new beautiful ornaments too. Metallic ornaments seemed to be the perfect painted Christmas ornaments to adorn the tree and compliment the theme.
Unfortunately, mercury glass ornaments are an extra cost at $16 each. Luckily I found an easy way to make my own Christmas ornaments. Significantly less expense and a simple project for anyone to do.
See my other easy DIY Christmas ornaments that I made a few years back.

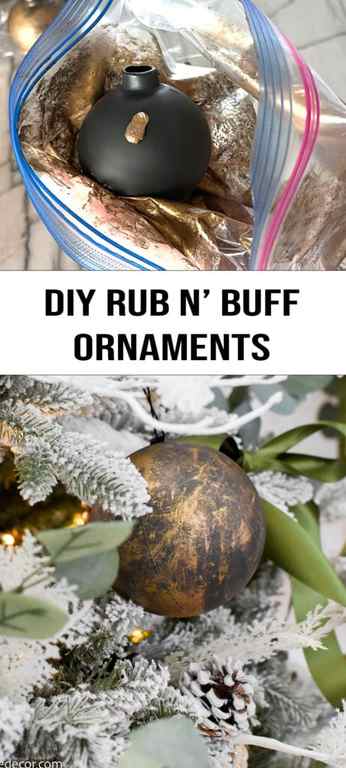
Supplies to Make DIY Rub n’ Buff Ornaments
For these homemade ornaments you will need to compile a small selection from the craft store. Hobby Lobby or Michael’s are a great place to check for holiday crafts.
You Will Need:
- Clear glass ornaments – $5 for 9 ornaments
- Chalk spray paint – Chalked in Charcoal
- Rub n’ Buff – Available in different colors but I used the gold and antique gold $20
- Gallon size plastic Ziploc bag
Rub n’ Buff – Rub n’ Buff is a handy little metallic paint that can be used on almost any surface. The shiny, mercury-like finish is a perfect way to embellish the outside of the ornament or another craft. I prefer it to using gold leaf sheets.
Step-by-Step Instructions for Rub n’ Buff Painted Ornaments
From expert crafters to kids of all ages out there, this is a simple project for easy DIY ornaments.
Project Preparation
Your first thing to do for these homemade Christmas ornaments is to remove the hook on the top of the ornament. This will help to keep any extra paint off the ornament hardware.
Paint Ornaments in the Base Color
Use your craft spray paint to cover the ornaments entirely in the chosen base color. Any paint colors will do, but I chose to use a charcoal spray paint. It is easier to lay the ornaments on dowels on a board so they don’t roll around.

Dry Ornaments
Let your ornaments dry completely. Too much paint will ruin your finish if it is still wet.

Add Rub n’ Buff Finish
Take your dried ornament and place it in a plastic gallon size bag. Add a drop of Rub n’ Buff to the ornament and close the bag. You can use any favorite color of the metallic shades. Use your fingertips on the outside of the bag to rub the Rub n’ Buff all around the outside of the ornament.

Each beautiful DIY ornament will have a unique exterior finish. Isn’t that charcoal and gold combination so beautiful?

How To Paint Christmas Ornaments
Supplies you need to paint ornaments:
- Clear glass or plastic ornaments – I prefer glass though because the paint does adhere a little easier.
- Testors Craft Acrylic 2oz Paint – assorted colors (we used Seafoam Matte, Snow White Metallic, Gold Rush Glitter Burst, Gold Metallic, Silver Metallic, and Deep Sea Matte)
- Testors Craft Marbling Medium
- Testors Craft Glitter Paint – in Gold, Iridescent, or Silver
- Rubbing alcohol
- Paintbrush
- Small plastic cups
- Plastic squeeze bottles
- Ribbon for hanging your ornaments

One of my top tips for how to paint Christmas ornaments is that less is more. The more paint you use, the thicker it is, the longer it takes to dry, and the more chance of the paint just running out of the ornament and colors bleeding together.
The first thing you will need to do is make sure your ornaments are completely clean, so pour a little rubbing alcohol into each, swish it around the inside, and then leave the ornaments upside down to dry overnight.
Now you can begin painting.
I found it easiest to use the squeeze bottle, not only to mix the marbling medium and acrylic paints together but also to get just small quantities at a time inside the ornaments.

When mixing the marbling medium with acrylic paint it is a 1 to 1 ratio. Once mixed, leave to sit for a little while so there are no air bubbles.
Now, gently squeeze just a little inside your ornament, turn your ornament a little and squeeze a little more. Let the paint run around the inside of the ornament before adding more paint. As I mentioned above the less you use, the better.

If you want to add more colors, do so before all the gaps have filled up.


You can use as many different colors as you like and you can also mix between matte, metallic, and glitter paints.
Once all the gaps are filled, place your ornament upside down in a cup to let any excess paint drain out, and then set your ornaments aside to dry. I recommend drying for at least 48 hours before you replace the top to your ornament.
If you want to add just one color, or mix say the teal to make a few different shades of it, then that will create a lovely watercolor effect inside the ornament.
Or maybe, you want to just mix a little white, gold, and gold glitter to make a simple ornament like this one.
But then, you can also add some glitter to the outside too. The Testors Craft Intense Glitter paint works best for this. You can simply apply a thin layer to the outside of an ornament you’ve poured paint into like this …
Or, you can use stencils to add an initial, date, or name to the ornament, like this …
Let’s break down a few of these different ornaments and I’ll show you exactly what I used to create them.
How To Paint Marbled Christmas Ornaments
This marbled ornament for example used the Testors Marbling Medium, along with the Testors Craft paint in Gold Metallic, Seafoam Matte, and Deep Sea Matte.
How To Paint Christmas Ornaments With Glitter
This glitter ornament used a combination of the Testors Craft paint in Seafoam and Deep Sea matter blended together inside, and then the Intense Glitter paint in gold on the outside.