All the help you need to transform your paint and canvas into a work of art. Includes the following:
Make a Stunning Cross Painting Easter Sign
I love spring and Easter art because the seasonal colors just scream “happy”! Easter is also a season of hope, and the colors convey that sentiment as well. Here’s a beautiful, large cross painting that I made with fun spring colors as an Easter sign. Learn how you can make one too, and even teach others to do the same.
I love decorating for spring and making spring art. After a dreary winter, spring makes me feel alive! And there’s something about Easter that tugs at my heart – God is SO kind, y’all.

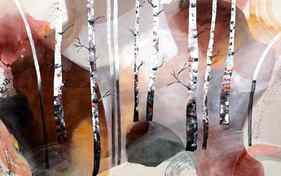
Oversized Cross Painting for Easter
I’ve created this Easter painting before, but this is the first time I am doing it this BIG! How big? Well, I’m creating the design on an Easter wood sign that’s a 24″x48″ piece of plywood. Painting on a piece of wood this large is so much fun.
Stencils are Key to Fun Art
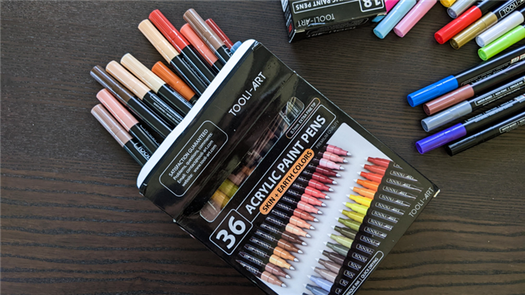
I love using kits of stencils. There are so many fun designs out there, and they really eliminate the pressure of painting a design by hand. I use stencils all the time to get a clean, professional-looking design easier and faster.
And I think they’re so beneficial that I don’t just use stencils for my own paintings. I also use them for my in-person paint parties! I have noticed that other people really find them helpful too so I usually try to have at least one stencil for every two customers at my paint party events.
Wondering where to find great stencils? You can check out my favorite stencil brand, Essential Stencils:
Feel free to use coupon code TEXASHEIDI for a discount, too!
How to Make a Cross Painting Easter Sign
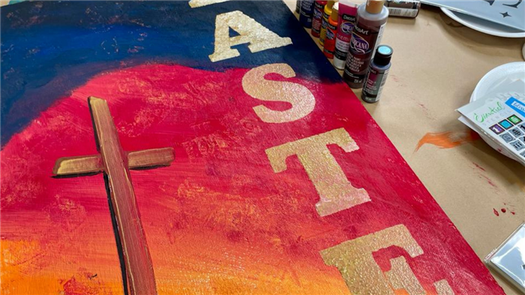
I used a lot of fun acrylic paint colors on this Easter cross painting design, and I loved how it turned out!

Start with the Base
I like to get those base colors for the scene and background on the board first so they can dry. Starting at the bottom of my plywood, I used brown to get that hill on the left corner of the board.
Once I got that shape down, I added in my yellow, orange, red, and magenta to start layering the colors of the sky from lighter yellow and orange and progressively getting darker and I headed to the top of the board.
Then I used primary blue along with solid black to create that dark top part of the design. With the exception of the brown, blend the colors together a little as you paint from the bottom of the board to the top.
Tip: When you paint on plywood, it’s important to dip your brush into your water to help blend the colors and spread the paint on the wood. You can see how I do that in the video tutorial down below!

Add the Cross
Now with a smaller brush, it’s time to add the cross to the painting. I’m starting with some brown and adding a simple cross painting rising up from around the top of my brown hill.
Because I’m painting wet on top of wet, as I pull the cross down with my brush in multiple layers, I start pulling in those other base colors which creates a cool, fun effect! Then do a quick dark shadow outline with a touch of gold paint over top to make that cross pop.
Easter Sign Lettering
It’s time to whip out the gold paint to create the Easter lettering, and I’m mixing it with just a bit of white. The key to this stenciling is to DAB the paint on there. Using the Essential Stencils dabber makes a sharper edge, but if you have to use a brush, you can take an edging brush and clean up the edges as needed.
Pattern and instruction options

Rustic Cross – How To Instructions
*Instructions do not include Tracer Pattern
Show Details
Part Number: SAPPI118-W
Canvas Art Painting Instructions
What IS Included:
- Step by step directions that are easy to follow
- Instructions tell you what colors, brushes and techniques to use to bring this painting to life!
- Includes a handy supply list to gather before you start
- Includes Helpful Tips & Techniques Guide
What’s NOT Included:
- THESE INSTRUCTIONS DO NOT COME WITH A TRACEABLE PATTERN
- The traceable pattern must be purchased separately
- For some designs, the traceable pattern has been discontinued and will not be back in stock for the time being
$5.48
Quantity:
Add to Cart
Pattern and instruction options

Rustic Cross – Reusable Pattern
Show Details
Part Number: SAPP118-W
Reusable paper pattern ensures reproducible designs by beginner painters. Printed in black and white. Pattern is sized to match design description size.
$4.48
Quantity:
Add to Cart
Pattern and instruction options

Rustic Cross – Full Color Design Reference Image
Show Details
Part Number: SAFCI118-W
Full-color 8″ x 10″ image of the finished painting, printed on cardstock. Perfect for consultant portfolios, classroom display, or color reference.
$3.98
Quantity:
Add to Cart
A Simple Latin Cross

Draw a cross outline. Draw a small square in the middle of your outline. You can use a ruler to help draw straight lines.

Draw more squares of the same size. Draw one above and below the first square you drew and one on each side.
Advertisement

Draw 2 more squares below the bottom square.

Divide the squares on the left and on the right of the cross, vertically and the remaining squares horizontally.

Draw the center with a marker. Make it thick and dark.

Erase your guidelines completely.
Advertisement
Method 2
Method 2 of 2:
A Budded Cross

Draw a cross outline. Draw a small square in the middle of your outline.

Draw more squares of the same size. Draw one above and below the first square you drew and one on each side, just like the first method.

Draw 2 more squares below the bottom square.

With a compass draw 3 circles each for the arms of the cross. The diameter of each circle is equal to one side of the square. Use the guidelines to align the circles.

Fill in the shapes with the color you want.

Erase all guidelines completely.
Advertisement
Community Q&A
Search
Question
Can I draw my brother on the cross?
Community Answer
I wouldn’t recommend that because it might hurt your brother’s feelings or scare him, and it would also be offensive to Christians.
Thanks! We’re glad this was helpful.
Thank you for your feedback.
As a small thank you, we’d like to offer you a $30 gift card (valid at GoNift.com). Use it to try out great new products and services nationwide without paying full price—wine, food delivery, clothing and more. Enjoy! Claim Your Gift If wikiHow has helped you, please consider a small contribution to support us in helping more readers like you. We’re committed to providing the world with free how-to resources, and even $1 helps us in our mission. Support wikiHow