- Dip the ends of the paper tubes into the paint on the tray a few times to generously coat the edges of the tubes
- Press the painted end of the tubes onto the paper. Be sure to apply even pressure across the whole bunny surface to make a complete imprint. If you just stamp down quickly, there may be little gaps missing in the design.
- Enjoy your cute little bunny stamps!
Easter Bunny Stamps – Easter Bunny Craft for toddlers and preschoolers
Want to recycle your old toilet paper roles in a brand new, fun way? Use them to make bunny stamps! Watch and learn as the Messy Play Lady repurposes cardboard toilet paper tubes as paint stamps for a creative Easter activity! This makes a great Easter bunny craft for toddlers as well as preschoolers.
This activity takes about 2 minutes to prep, and is so easy and simple! If you’re more artistic than I am, you can make these bunny stamps into realistic bunnies by adding faces, whiskers, and so on. I just left mine as is!
Some links below are affiliate links. When you buy through these links, we may earn a commission. Learn more →
MATERIALS:
- Clean, empty toilet paper tubes
- Tape or glue
- Paint (I LOVE this washable tempera paint)
- Paper (Try this 9×12 drawing paper)
- Tray (I use these trays to help kids contain the mess)
- Markers, Color Pencils, Crayons, etc. to decorate bunnies (optional)
SETUP:
- Flatten two of the toilet paper tubes and crease them. These will be the ears on your Easter bunny
- Use the tape or glue to connect these two flattened tubes so they are stacked and flush at one end. Be sure to connect the tubes along a folded edge so that the bunny ears are close together at the bottom. Here you can see the tape placement (purple rectangles) on the tube.
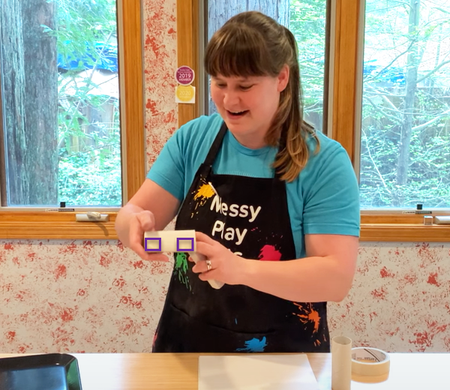
When you’re done, your bunny ears should look like this: - Use tape or glue to affix the third round paper tube to the bottom of the ears (2 creased paper tubes). The round paper tube is the bunny face! When you’re done, your bunny will look like this:
- Adjust the shape of your bunny as you like
- Squirt a bit of your paint directly onto the tray (you could use a paper plate here instead if you don’t have a tray) and spread it out so that the paint blob is large enough to cover the entire bunny stamp
- Set a piece of paper at the place setting for each child
STAMPING TIME:

- Dip the ends of the paper tubes into the paint on the tray a few times to generously coat the edges of the tubes
- Press the painted end of the tubes onto the paper. Be sure to apply even pressure across the whole bunny surface to make a complete imprint. If you just stamp down quickly, there may be little gaps missing in the design.
- Enjoy your cute little bunny stamps!
More Creative Ideas:
- After letting your paint dry, let your child decorate the bunnies with eyes, nose, and whiskers!
- Continue stamping with each press rotating around the center axis, lining up the circle to create a flower design
- Make several bunnies and use multiple colors of paint (allow kids to experiment with making 2-tone bunnies or mixing colors)
- Use new toilet paper tubes to create different stamp shapes, such as 3 circles in a line for a snowman
Post your kid’s Easter Bunny craft finished artwork on Instagram and tag @MessyPlayKits! I’d love to see all the cute bunnies you make together.
Share this Easter Bunny Craft Tutorial with all your mom friends!
- Share Share on Facebook
- Tweet Tweet on Twitter
How to make a bunny face using paint
- Home
- About Us
- All Tutorials
- Kids Crafts
- How to Make Slime
- Animal Crafts for Kids
- Decoupage Kids Crafts
- Handmade Gifts by Kids
- DIY Room Decor Crafts
- Mason Jar Crafts for Kids
- Coffee Filter Kids Crafts
- Cotton Ball Kids Crafts
- Egg Carton Kids Crafts
- Magazine Kids Crafts
- Paper Plate Kids Crafts
- Plastic Bottle Kids Crafts
- Popsicle Stick Kids Crafts
- Toilet Paper Roll Crafts
- Christmas Crafts
- Halloween Crafts
- Father’s Day Crafts
- Mother’s Day Crafts
- Summer Crafts

How to Face Paint a Bunny, Dog & Cat using Arteza Face Paint for Kids
March 24, 2018 No Comments
We took a break from painting paper this week and tried our hand at face painting! It’s something the kids have been wanting to do for a long time. But I’m always hesitant to let children use products a ton of yucky chemicals. So we’ve been waiting for just the right face paint. Lucky for us Arteza, an online art supply company, had just the right product. We found a premium face painting kit for kids that is non toxic, paraben free, water based & easy to wash off.
Better yet, Arteza asked us to try the face paints and give the product an honest review. We liked it so much that you can benefit by receiving a 10% DISCOUNT ON ALL ARTEZA PRODUCTS!
We would NEVER endorse something we hadn’t tried ourselves or throughly enjoyed. As we do with all our crafts or reviews, we test and compare. For this face painting challenge / review we compared the Arteza face paint product to a very popular face paint kit you can find at Michael’s.
The kids and I noticed the Arteza Premium Face Paint for Kids went on much smoother, felt lighter on the skin and washed off easier. Plus, the fact that there are no paraben’s in the product make it a no brainer.
The face paint kit we use comes with 16 colors, two brushes, two glitter containers & 24 stencils. You can see the product in detail in the “How to Face Paint Animals” video! We’re not sure you can purchase the exact same kit with glitter any longer, but the premium face paint kit with 16 colors, 2 brushes and stencils is available here: https://goo.gl/pPX1dd
In this easy tutorial you’ll learn how to face paint a bunny on kids. We also show you how to paint a cute cat & dog face, but you’ll have to watch the video at the bottom for those
ITEMS NEEDED TO FACE PAINT A BUNNY FACE:
• 1 set of Arteza Premium Face Paint for Kids
Arteza Coupon Code DAK-KON-294 for 10% OFF
https://www.amazon.com/gp/product/B075YF8CFX/ref=as_li_tl?ie=UTF8&tag=kidscraftsbyt-20&camp=1789&creative=9325&linkCode=as2&creativeASIN=B075YF8CFX&linkId=ed6acb41964606dae37fcd35ed3bafd7HOW TO FACE PAINT A BUNNY!
STEP 1: Begin by dabbing the soft wedge sponge in White and dabbing it against the chin and above the lip below the nose.
NOTE: It’s important to DAB the paint and not brush the paint on the face with the wedge. This will give you more saturated colors. You’ll use the paint brush for areas you need to brush. In the picture below, riley touching up the white around the corner of the lip with smaller paint brush.

STEP 2: To make the cheeks, dab the sponge in pink and press in a circular motion.

STEP 3: Use the thicker paint brush and put Black face paint on your brush. Now you can apply it on the nose. You’ll want to make an upside down triangle, continuing to paint around the nostrils.


STEP 4: Complete your cute bunny nose by adding a black vertical line from the bottom of the nose to the top of the lip.

STEP 5: To face paint the bunny muzzle, dip the back of your paint brush in Black face paint and make three dots in a triangle shape on both sides of the vertical line.

NOW THE FUN PART, ADDING WHISKERS!
STEP 6: Using the muzzle dots as your guide, take your thin paint brush and drag a line diagonally in a quick motion for whiskers.
NOTE: This was Riley’s favorite part


STEP 7: At this point Riley went back and dabbed White face paint on the bridge of the nose and the forehead.

STEP 8: To make the bunny’s ears, we’re going to paint a black triangle above each eye and then accent the inside with white and then pink.


STEP 9: And that’s it! Our bunny faces came out adorable!


Hey, and if you’re one of those people who prefer learning by watching video, we’ve got you covered.
SillyFarm Supplies | Everything Face And Body Art
- My Account
- Wishlist

SHARE YOUR LOOK
Use the hashtag #sillyfarm on instagram for a chance to have your look featured.
We carry the LARGEST selection of face and body art supplies. Our range of products covers everyone from beginner painters to seasoned professionals. Each of our products are hand picked and tested by the Silly Farm staff to ensure quality and reliable use. If you have any questions relating to brands, which palettes to start with, or what is the best shade of red, we encourage you to ask us!
Call 954.472.5000 Mon-Fri 10:00am – 6:00pm ET
QUICK LINKS
- Face Paint- Shop by Brand
- Airbrush and Stencils
- Brushes & Sponges
- Glitter and Bling
- Specials and More
- Home
- About Us
- Contact Us
- FAQ
- Returns & Exchanges
- Shipping Information
- Terms & Conditions
- Youtube Video Channel
- Get Social
- Privacy Policy