•Take a dry fine brush and stroke it across the glaze to soften any sharp marks.
•Make broad horizontal figure eights with the brush to feather the colors into one another.
Decorative Painting Techniques: Two-Tone Patina
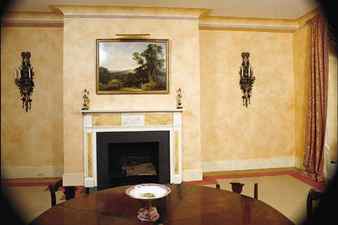
To create the effect of patinaed plaster, Finkelstein brushes two different colors of glaze over a base coat of paint, then blots it with cheesecloth. The technique works well with colors from the same family, but can also work with unrelated colors. One foolproof method is to pick a “goal” color from a manufacturer’s color strip, then go one shade lighter for the base and use the goal color and a shade one notch darker for the two tinted glazes. But remember: Always test a scheme on posterboard before committing to it on the wall.
Getting Started
The secret to decorative painting is glaze, a transparent coating that’s tinted and applied over a painted wall. Glazes come in latex (water-based) and alkyd (oil) formulas. Finkelstein recommends the latter for its longer working time. Note, however, that alkyd glaze requires an alkyd base coat, and cleanup means mineral spirits or turpentine. Glazes are sold untinted, so to get the color you want you’ll need to add pigment. Many paint stores will sell you small amounts of the pigments they use to tint paint separately; for as little as $5 you should be able to purchase enough to tint a gallon. To get the color right, fill a small bucket with glaze and add pigment drop by drop. Make sure your base paint and all glazes are thoroughly mixed and that you try them out together on a test piece of primed drywall before you begin.
Step 1
Prepare the Wall

•Paint the wall in the base color. Allow to dry.
•When glazing, work in manageable, 5-foot sections so the wall doesn’t dry as you work.
•Using a piece of cheesecloth, spread on a coat of clear glaze to help keep the surface workable longer.
Step 2
Apply the First Color

•Apply the first tinted glaze to the wall with a round glazing brush. Use short, quick wrist movements to make a random, loose X pattern while keeping your elbow steady.
Step 3
Introduction to Dual Brushes

Hello everybody! In the CLIP STUDIO PAINT 1.10.10 update, [Double Brush] has been added to the brush customization settings. This function allows us to combine two brushes in a single stroke to obtain diverse and interesting results.
We can also experiment with the way the brushes interact with each other to change the effect of the brush.
■ From simple textures to full color special effects, in this short tutorial I am going to introduce you to the double brushes function and show you some examples to start creating your own brushes or combine some of our favorites obtaining unique and original results.
Introduction to dual or dual brush
To quickly understand the new feature let’s look at some of the new materials added in version 1.10.10 that use Dual mode.
■ Experimenting with these professionally created brushes can give us insight into the potential of this new feature and get inspired to make our own materials.
I suggest you read this official guide to familiarize yourself with the function and terms. ▼
■ [1] One of the most common and useful uses for dual brushes is to create textured brushes. In this example I have a main brush with an organic shape, opacity and size variation with the pressure of the tablet, but as you can see it has no texture.
• [1.1] In the tool property palette, press the wrench icon to open the sub-tool detail menu with the brush settings.
We select D- Brush shape to see the double brush settings.
• [1.2] If we activate (Double Brush) we can see that the preview of the stroke changes and now it has a bit of texture. The blending mode is multiply, the most common for adding texture with dual brushes. Each mode generates different results, based on the characteristics of the 2 brushes and how they are combined, it is important to experiment with each blending mode to get an idea of what results we can expect from each one.
• [1.3] In the D-Brush tip submenu we can see the shape of the second brush and its characteristics. This tip is combined with the original shape of the main brush, in this case it “erases” part of the original stroke to generate the pastel texture.
• [1.4] The final result of the double brush gives us a more interesting stroke thanks to the texture that simulates a traditional crayon or pastel.
Although it is a simple method and the most basic use of the double brush, this technique is very versatile, modifying the parameters of the second brush, changing the tip or playing with the blending modes, we can create infinite variations for our brushes, obtaining results more personal, unique and original.
■ [2] Let’s take a look at how some decorative brushes that use the dual function work.
The brush (Zipper) Combine 2 tips to create the accessory. If we deactivate the double brush we can paint each individual part and if we activate it we can paint the closed zipper.