High-quality images not only showcase your products effectively but also help you stand out in a crowded marketplace. While achieving this level of visual excellence often requires professional photography and expensive image manipulation software, Deep-image.ai’s AI background generator offers an innovative solution to create unique backgrounds for your product
A Complete Guide to Image Enlargement for Printing
Since printouts of photographs are so appealing, most people treasure retaining them as keepsakes. Additionally, memories associated with digital photographs fade from consciousness after a while. One of the most common human failings is forgetting some of life’s most significant memories. As a result, you ought to print any photos that hold special meaning for you.
You will learn how to enlarge an image for printing from this instruction. We will take you through the requirements for printing photographs and the most effective tools for enlarging photos before printing.
In this article
Why Is Enlarging an Image Useful?
Reorganizing can happen when you are adjusting for distortion of the lens or rotating a picture, whereas image scaling is required whenever you need to change the overall amount of pixels. You must increase the number of pixels to view more information when you zoom in on an image.
Knowing the proper size for the picture you wish to utilize is crucial when designing for print. Nothing is harder than printing out your work only to discover that the picture is pixelated or skewed. Find out the primary printing sizes and what each is suitable for:
- 4 x 6 inches.
- 5 x 7 inches.
- 8 x 10 inches.
- 8.5 x 11 inches.
- 12 x 18 inches.
- 18 x 24 inches.
- 24 x 36 inches.
Choose a digital image with a resolution of 7200 x 10800-pixel values for extra-large prints for the greatest quality. When making a picture this big, use a 3:2 aspect ratio.
How to Enlarge an Image to Print?
You will get a pixelated picture if you magnify a photo incorrectly. We will walk you through the process using the five most common techniques.
Method #1. Enlarging a Picture for Printing in Photoshop

Among the most commonly used software tools for enlarging photos is Adobe Photoshop. When you expand photographs, the program’s image size function offers a way to improve clarity and preserve key information. Use Photoshop to expand an image by following the instructions shown below.
Step 1 Open your photo.
Step 2 Choose an image’s size.
Step 3 A dialog window for image size will appear.

Step 4 Adjust the document size, resolution, and pixel dimensions.
Step 5 Choose the Resampling Method after that, and then click OK.
The last action to do is this. To select the correct radius, move the slider. Changing the preview will result in an improved edge.
Method #2. Enlarging a Picture for Printing in Lightroom

You must know that Adobe Lightroom offers a Super Resolution function if you have never utilized it. This function can treble the size of photographs. The best thing is that it does not impact the image’s quality. If you wish to use Lightroom to expand a photo, follow the following procedures.
Step 1 Open the picture in the Lightroom processing program.
Step 2 To upload a picture from your computer, select Import from the menu.
Step 3 Choose the photo you want to resize, and then File > Export.
Step 4 Set your preferences and modify your image’s dimensions, including the height and width.

Step 5 To save the image, select the Export option.
The software uses machine learning techniques to improve the quality of the photos. Do not overlook the opportunity to preview the improvements using the special window. Select the Enhance option if you prefer the outcome. Along with the original image, you will get a DNG file.
Method #3. Enlarging a Picture for Printing in Preview

On your PC, there may already be free photo scaling software that can alter DPI and set up images for printing. In fact, because of how user-friendly this tool is, tutors regularly use it to show pupils how to print pictures.
Step 1 Open the image

Step 2: Open the Size Adjustment Window.

Step 3: Select inches and pixels.

Step 4: Resize the image to your choice.
Set the pixel density to 300px/inch and uncheck “Resample Picture.” It will automatically produce the maximum width and height values. You may export the file if you are happy with the results.
You can determine how much one can enlarge an image without losing quality once the application displays the maximum Height and Breadth at 300 DPI. Of course, choosing whether value or size is more crucial is entirely up to you.
Method #4. Enlarging a Picture for Printing Using PixCut

With the help of the free application PixCut, you may expand photographs without sacrificing their quality. The greatest part: You may increase the image’s size by up to 400%. To find out how to expand a picture for printing using PixCut, follow the instructions below.
Step 1 Visit the official website.
Step 2: Select the Upload Picture option to upload a picture from your device. You may also drag or copy the image you want to resize, then paste it. The image will automatically expand due to the technology. It has a 400% zooming capability for photos.
Step 3: You may download your photo when PixCut has completed enlarging it.

Since PixCut uses Automatic AI, it is more successful than other online enlargement applications. In essence, this constitutes one of the greatest aspects that distinguish PixCut from its rivals. Additionally, it is quick, ensuring that you conserve time while expanding a photo.
Method #5. Enlarging a Picture for Printing Using Windows Paint

Following the instructions below will let you resize an image using Paint before printing:
Step 1 Type “paint” into the Windows search bar.
Step 2 To run the software, double-click on it.
Step 3 For uploading the image to Paint, select the Open button after finding it on your computer and selecting it.

Step 4 Select the Skew Logo and Resize option from the home menu.

Step 5 The quality, width, and height are all adjustable.
Step 6 In Paint, you may include a caption by using the Text tool.
Step 7 Select Save As after clicking the main tab.
Step 8 Then choose JPEG, give the image a succinct descriptive designation, and save it.
Sign up for more like this.
Enter your email
With Deep-image.ai, you don’t need to be a professional photographer to create breathtaking images. Our app makes it easy to achieve outstanding results in just a few clicks.


Monetizing AI-generated art: How to get profits with Deep-image.ai Image Generator?
The world of art is experiencing a groundbreaking transformation, thanks to the power of artificial intelligence. With AI-driven tools like Deep-image.ai, creating original and eye-catching artwork has never been easier. What’s even more exciting is that you can monetize these AI-generated masterpieces in various ways. In this article, we
Nov 8, 2023 — 4 min read

Revolutionizing Interior Design – The Role of AI Image Generators
Architects and designers have traditionally relied on sketches, blueprints, and physical models to communicate their ideas. However, the advent of artificial intelligence (AI) image generators has dramatically transformed this industry, allowing professionals to produce stunning, realistic interior design concepts with ease. One such platform that has gained prominence in this
Nov 6, 2023 — 3 min read
Part 1. How to Enlarge a Picture for Printing on Windows
If you use a Windows-based computer and want to rely on your computer’s built-in apps, then use Paint . Many of you must have used it for various purposes because it is one of the most versatile software that you can find on a desktop. Therefore, Paint is an excellent solution to your question on how to enlarge a picture for printing on Windows 11/10 and other versions. Yes, Paint is a tool that has been available since version 1.0 of Windows in 1985. Furthermore, this tool supports almost all common image types, such as TIFF, PNG, JPG, BMP, and GIF.
Along with this are the fantastic features and tools that have been updated over the years. One of its useful tools is its resizer which contains the presets of the photo’s percentage and pixels to modify. However, if you were to enlarge your image and want to bring it back to its original size, it would affect the original quality of the photo. Nevertheless, if you purely want to enlarge it, then Paint is a printer-friendly tool to use. Hence, here are the steps to make your file bigger with Paint.
How to Enlarge the Image to Print with Paint
Launch Paint and load the photo you want to edit by clicking the File menu and then the Open tab. Alternatively, you can go to the folder where your photo is placed, right-click it, and open it with Paint .

Once the photo is uploaded, hit the Resize icon among the options in the Image section. After clicking, a small window will appear. Type the size you want to have in the Percentage section under Horizontal .

Now, go to the Pixels section and put the value of the size that you need for your photo. If you want to customize the image dimensions under the Vertical side, you must disable the auto aspect ratio, which is presented in the middle of the two ratios. Hit the OK tab after.

After that, you can check the photo’s size under the image preview. Finally, your photo is ready for printing. To print, go to the File section and hit the Print tab. Or just press CTRL+P on your keyboard.

Part 2. How to Efficiently Enlarge a Picture for Printing Online
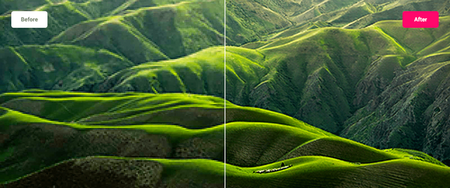
Do you want to know another fantastic way to enlarge a picture for printing without losing quality for free? Then here we present MindOnMap Free Image Upscaler Online. It is an ultimate online image enlarger that allows you to upsize an image up to eight times more significantly with intact pixels and in high quality. Unlike Paint, this powerful online tool can maintain the excellent quality of a photo that has been enlarged and shrunk simultaneously. Furthermore, it gives you a super simple yet intuitive interface that even an elementary student can work on. What is more surprising is its ability to reduce the noise and clean the photo you uploaded while waiting for the enlargement process to finish. And for the record, it is one online tool that offers a quick procedure credited to its Artificial Intelligence technology.
Despite being a free photo resizer, this MindOnMap Free Image Upscaler Online charitably sustains you with an interface free from ads. Additionally, you will be astonished at its outputs, for they are free from watermarks aside from their excellent quality. Henceforth, we will be glad to show you the comprehensive steps on how to enlarge a picture for printing online.
Using your desktop, go to the official page of MindOnMap Free Upscaler Online and immediately click the Upload Images tab at the center of the page. However, you can choose to select an option from the Magnification section before you upload the photo for a faster procedure.

After uploading your photo, it will direct you to its main interface. This time you can already proceed to save your photo. However, if you still want to work on it more, you can still access the Magnification section above the preview section. Then, feel free to check the difference between the original and the output photo.

After that, you can now click the Save button, or if you want to change the photo, hit the New Image tab. Note that if you click the Save tab, you will not need to download the photo, for it will be automatically done for you. Click here to learn how to resize images.

Part 3. FAQs about Enlarging Photos for Printing
How do I enlarge a picture to print without the software?
Using an online tool with the absence of software is the best choice to have by using an online tool such as MindOnMap Free Image Upscaler Online. You will just need to upload the photo that you need to enlarge, then choose the magnification for its size, then save the photo to download, as simple as that.
What is the excellent print quality of my photo?
It is recommended to have a minimum of 300 DPI quality for printing.
Is an AI-powered photo enlarger better than the traditional one?
Yes. Because AI-powered tools are more efficient in editing in detail than traditional ones.
Conclusion
Now that you know how to enlarge a picture for printing, you can edit your photos before going to the printing shop. Or, you can directly print your photos at home as long as you have a good printer and other devices. After all, you already have the best online photo enlarger, the MindOnMap Free Image Upscaler Online, that will provide you with excellent output.

Create Your Mind Map as You Like


