Simple Bud Vase (glass)
This simple bud vase offers the ultimate flexibility. You can place a single vase, duo or trio on a dining or cocktail table, spread them out on the bar, in the bathroom. anywhere! Sold as singles (with a minimum order quantity of three), they are designed to be a cohesive, but not identical, set of arrangements.
Sleek with clean lines, this offering is for the minimalists. Each bud vase will include 1-4 flowers and some greenery or textured elements. You can order various sizes or keep them all the same. The small vase is 4.5″ x 2″, the medium vase is 6″ x 2″, and the tall vase is 8″ x 4″.
Choose from one of our colour palettes or let us know your custom palette in the notes section. Want to know what colours might be included in your colour palette?
Muted Neutrals: May include white, cream, ivory, soft peach, tan, brown, burgundy, and other muted and earthy tones
Rich Jewel Tones: May include burgundy, red, mauve, magenta, coral, peach, purple, and other dark and earthy tones
Soft Pastels: May include peach, pink, mauve, lavender, light blue, cream and other soft tones
Bright & Vibrant: May include yellow, orange, pink, purple, blue, red, peach, salmon, and other vibrant tones
Whites/Creams & Greenery: Will include mainly white, cream and ivory flowers with various greenery and unique foliage types and textures
The price includes the cost to purchase the vase you see in the pictures. If you would like to rent the vases, they would need to be returned to us within 7 days of the event. Once returned, you will receive a 5% refund for all items you returned a vessel for.
(This product is part of both our A LA CARTE Wedding and A LA CARTE Event Flower Collections. Questions? Check out the FAQ at the bottom of the collection pages.)
First Timer? Looking for the best and most reliable flower delivery in Toronto? Look no further. Our thousands of repeat customers will tell you that our specialty flower arrangements are sure to wow. If something goes wrong, our full time in-house admin team will be there to help make it right. We pride ourselves on our excellent customer service. Give us a try, we promise you won’t be disappointed.
Share: Share on Facebook Share by instagram
Translation missing: en.products.product.loader_label
Ceramics Tutorial: How to Create a Simple Clay Vase
Creating your own pottery is an appealing idea, but it often requires an off-putting amount of equipment (from a wheel to a kiln).
This easy clay vase technique allows you to dispense with the potter’s wheel and is taught by Sandra Apperloo (@thepotteryparade). This Dutch potter created The Pottery Parade and is the woman behind a series of techniques designed to make pottery more accessible.
All you need is:
• Clay
• A brush that’s wider at the base than the bristles
• Newspaper
• A rolling pin
• A scraper
• A toothbrush
Learn more in the video:

Create a simple clay vase in 3 easy steps
1. Preparation
Roll a piece of newspaper around your paintbrush. Then knead your clay and roll it out with the rolling pin, leaving it as smooth as possible.


Use a sharp tool to mark the shape of the vase on the rolled clay.

2. Modeling
Dip your toothbrush and scraper in water, and use these damp tools to create lines on one of the ends of the shape you’ve created with the sharp tool. This is very important: it increases stickability when you roll your vase.

Now slowly roll the clay around on itself, using your newspaper-wrapped paintbrush as the central axis and your support. Use the toothbrush to create more lines and therefore better adhesion.


Slide the vase forwards and backwards, pressing gently to close it nicely together.

3. The finish
Smooth the ends of your vase together using a sponge or scraper. Then gently twist the brush inside the vase to make it easier to get it out. Use the spatula to trim the ends off the top and bottom of your vase and make them straight. Use a sponge to ensure your vase is completely smooth and has no rough bits.


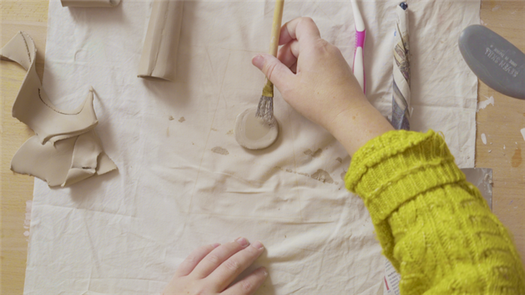
4. The base
Knead and roll out a little more clay, to make a smooth, fine disc. Rest the vase on this disc and use a sharp tool to draw a circle around the base of your vase. Use your wet toothbrush or scraper to create lines across the entire circumference of your little disc, which is going to become the base of your vase. Stick the base to the body of the vase.


Like this tutorial? Remember Sandra Apperloo teaches you how to create playful pottery using original techniques in her online course: Creating Ceramics with Character.
You may also be interested in:


