How to Build a Birdhouse
Building a birdhouse is a simple woodworking project you can do with young children over a weekend. Watch this video and follow these steps for building an easy birdhouse with scrap wood.
Share All sharing options for: How to Build a Birdhouse
Everyone has scrap wood lying around the shop or garage. Why not put it to use? Building a birdhouse is a simple woodworking project that parents can include their young children in. Follow these steps to learn how to build a birdhouse with everyday materials.
Steps for Building a Birdhouse:
1. Size the Pieces
Using a miter saw and the provided cut list, cut the 1×6 board and ¼-inch plywood pieces to size. Mark the center point along the top edge of the front and back walls. From the center point, clip each top corner at a 45-degree miter to create a peak.
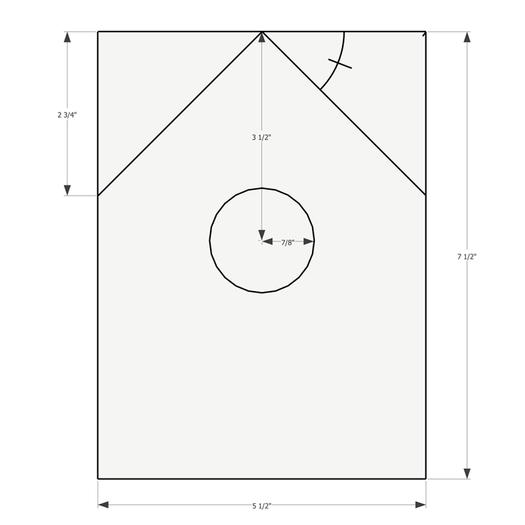
2. Drill an Opening
On the front board, make a mark centered on the width of the board 3½-inches from its peak. Using a hole saw, paddle bit, or jigsaw, create a hole that’s about 1¾-inches in diameter.
3. Attach the Sides and Front
Set the two “sides” on edge so that a 4¾-inch-tall edge is facing upward. Apply glue to each edge. Place the front of the birdhouse onto the edges with the sides of the front setting flush with the outside face of each wall. Using a nailer, drive 1¼-inch brad nails through the face of the birdhouse and into the edge of each side wall.
4. Add the Back
Flip the assembly. Apply glue to the back edge of each side wall. Place the back of the birdhouse onto the sides. Drive 1¼-inch nails through the back and into the side walls.
5. Mount the Base
Apply wood glue to the bottom edge of all four walls. Position the base so that its back edge sets flush with the back wall and the front stretches beyond the birdhouse’s front wall to create a ledge. Nail through the base and into each adjoining wall.
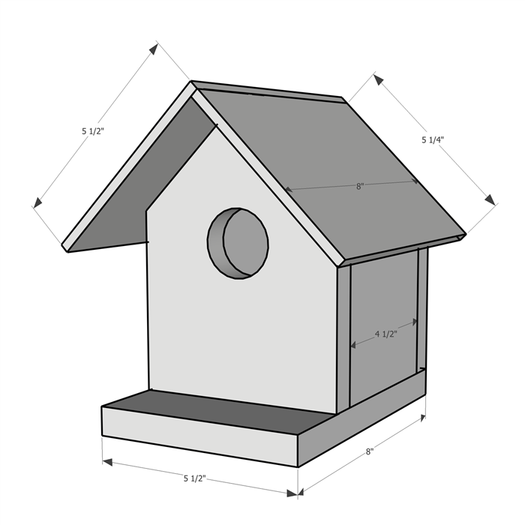
6. Attach the Roof
Apply wood glue to the peak of the front and back walls. Place the shorter roof panel into place, flush with the tip of the peak. Nail through the roof and into the front and back wall to secure it in place. Position the second roof panel, overlapping the exposed top edge of the first panel. Nail through the roof and into the front and back walls to complete the assembly.
7. Apply the Finish
Fill all the nail holes with exterior-grade wood filler. Let dry. Sand the assembly smooth. Apply two coats of exterior paint or wood stain.
8. Add a Hanger
Drill a hole in each side of the roof along the peak. Push a piece of twine down through the hole, and then pull it through the front opening with a pair of pliers. Knot the end and then pull it back up against the inside of the roof. Repeat on the opposite side to create a loop. (As an alternative, attach an exterior-grade hook, or skip the hanger altogether and set the birdhouse on a sturdy surface.)
Materials
- 1×6 Board
- ¼” Plywood
- Exterior Wood Glue
- 1¼-inch Nails
- Exterior Wood Filler
- Sanding Sponge
- Exterior Paint or Wood Stain
- Paint brush
- Rope or Twine to hang the birdhouse
- 1 x 6 Front and Back Wall- 2 @ 7½ inches
- 1 x 6 Side Walls – 2 @ 4¾”H x 4½”D
- 1 x 6 Base – 1 @ 8 inches
- ¼” Plywood Roof Panel – 1 @ 8″D x 5 ½”W
- ¼” Plywood Roof Panel – 1 @ 8″D x 5 ¼”W
STEPS


Start with drawing the horizon line through the middle of the paper.
Place 2 vanishing points.
Designate areas for each of the six birdhouses. Use very fine lines – these are going to be erased later.

Work with one birdhouse at a time.
Start with building a basic box in 2 point perspective:
– front corner
– receding lines
– left and right corners
– bottom side

Find the center of the bottom side by drawing two diagonal lines.
Add a post to the central area.
Use 2 lines and a curve to define the post.

Posts can be any shape.


Find the center of the front side by drawing two diagonal lines and adding a vertical center line.
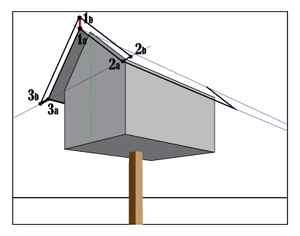
Decide how high you want your roof top to be (place point 1).
Draw lines from the top of the roof through the front top corners
Have the roof sides go past the corners.
Choose the bottom corner of the roof: point 2.
Connect point 2 with the left vanishing point.
Points 2 and 3 should be on the same receding line.


Connect the roof top with a vanishing point and extend the receding line to extend the roof.
Also, connect points 2 and 3 with the right vanishing point.
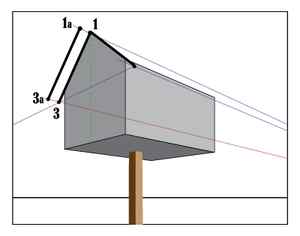

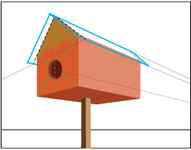
Define the back side of the roof.
You just completed the inner part of the roof. But the roof is not paper-thin. We need to add thickness it it now.

Draw short vertical lines from each roof corner.
Decide how thick your roof should be by placing a mark at the very top.
Connect the mark to the vanishing point. That’s our roof top!
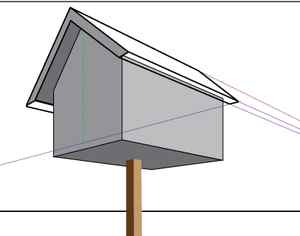
From the roof top mark:
Draw two lines that are parallel to the roof slant. Stop at the short vertical lines that you placed before to mark the thickness of the roof.
The front edge of the roof is done. Complete the side edge.


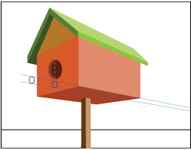
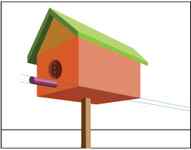
Place an oval in the center of the front wall. This will mark the bird entrance. Don’t forget to add thickness to the opening.
Landing stick should also follow the same perspective rules.
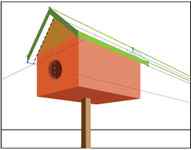
Erase all receding lines before coloring.


