We can’t wait to see your undersea artworks.
How to Draw an Octopus: A Step-by-Step Tutorial for Kids
Below you’ll find simple step-by-step instructions on how to draw an octopus for kids. Learning octopus drawing will help them upgrade their knowledge of these species effectively. Besides this, practicing aquatic animal drawing for kids will enable them to explore different marine species and their importance in the ocean food chain.

An octopus is an aquatic creature belonging to the family of Mollusca. They have prominent features like eight arms or tentacles, large eyes and bulbous heads. Have your children ever seen an octopus? If not, you can take kids to an aquatic museum where they get to experience and see an octopus in real life. Besides, you can teach them about octopuses through drawing.
Kids can learn to draw the perfect illustrations of the octopuses on a sheet of paper by following the stepwise instructions systematically. You can conduct drawing activities for kids at home to make learning fun and entertaining. With these activities, you can enhance their creativity and visualization skills from an early age.
How to Draw an Octopus: A Step-by-Step Guide for Kids
Learning how to draw an octopus will help kids understand its physical features and other essential characteristics effectively. Therefore, you can provide them with simple stepwise instructions so that they can easily draw the illustration of the octopus on a sheet of paper.
Kids can learn about habitats, eating habits, behavior and interesting facts about octopuses through drawing. Most importantly, they will learn the function of the tentacles and suckers of the octopuses while drawing. It is needless to say that drawing for kids is an effective way to learn new concepts creatively.
What You’ll Need?
- A drawing sheet
- A pencil
- An eraser
- Crayons or color pencils
Easy Stepwise Instructions on How to Draw an Octopus
The step-by-step drawing tutorial of an octopus for kids is given below.
Step 1:

Draw a semicircle on a sheet of paper for the octopus’s head.
Step 2:

Draw a pair of elongated loops below the head of the octopus for the first pair of tentacles.
Step 3:

Draw a pair of elongated loops adjacent to the first pair of tentacles for the second pair of tentacles.
Step 4:

Draw a pair of elongated loops adjacent to the second pair of tentacles for the third pair of tentacles.
Step 5:

Draw a pair of elongated loops adjacent to the third pair of tentacles for the fourth pair of tentacles.
Step 6:

Draw a pair of circles on the octopus’s face for the eyes, followed by an arc for the mouth.
Step 7:
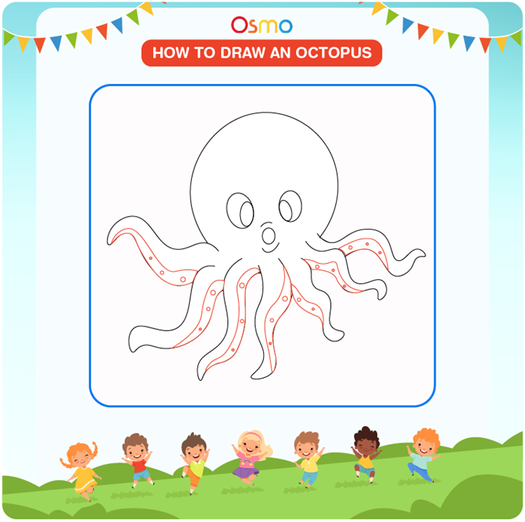
Draw a few dots below the octopus’s tentacles for the suckers
Step 8:

Finally, color the illustration of the octopus using crayons or watercolor paints.
Tips for Learning Octopus Drawing for Kids
A few tips for learning how to draw an octopus for kids are mentioned below.
- Teach kids about octopuses and their importance in the aquatic world through drawing.
- Teach kids to start drawing from the head, followed by the tentacles and suckers of the octopuses.
- Show images or videos of octopuses to kids for drawing easily.
- Take kids to underwater museums to see how an octopus looks in real-life.
- Encourage kids to practice drawing until they become proficient.
How to Draw An Octopus – Let’s Get Started!
We will be starting this guide on how to draw an octopus by drawing a big, round head for the octopus.
To do this, you can draw a curved, rounded line for the top of the head as you can see in the reference image.
As you can also see, there should be a large gap at the bottom as we will be adding some tentacles there very soon.
Step 2 – Next, draw some tentacles
One of the most notable aspects of an octopus is the tentacles it has, so we shall start drawing some in for the next few steps of your octopus drawing.
We will be drawing two tentacles on the left-hand side of the octopus for now. You can draw these using some curvy lines connecting to the bottom of the head.
Tentacles can move in all sorts of different directions so don’t be afraid to change up the positioning of them or make them even more bendy and twisty!
Step 3 – Now, draw in the facial details
You’ve drawn two tentacles now, so you shouldn’t have any issues with adding more in the next few steps of this guide on how to draw an octopus!
For this third step, we shall be adding two more connecting to the ones from the previous step.
You can make them look like the other ones, and again you could always change up the positioning of them if you prefer.
How to Draw an Octopus – Step by Step Drawing Tutorial
This how to draw guide uses the flow drawing technique. Flow drawing is all about drawing with simple lines and shapes that are repeated often to create definition. This technique is perfect for kids and beginners, as it focusses on engaging in the process and developing natural rhythms in creation. Children will use this process to create the simple outline of their octopus and are encouraged to use their imaginations to come up with their own designs.
Materials:
- White Card Stock or Mixed Media Paper
- Wax Crayon or Oil Pastel
- Acrylic or Watercolor Paint
- Black Marker Pen (Optional)
- Acrylic or Chalk Pens (Optional)
Download the Octopus How to Draw Printable
The templates are available to members of the Arty Crafty Kids club.
Members will need to log in to access the templates: https://www.artycraftykids.com/product/flow-drawing-octopus-guide/
Not A Member?

Watch the Octopus How to Draw Video:

Draw a large oval shaped arch
Grab a crayon or an oil pastel and let’s start by drawing a large oval shaped arch in the middle of the sheet.

Draw the Octopus’ first tentacle
Next, add the octopus’ first tentacle by drawing a smooth lines. Remember, if the first attempt doesn’t feel right, just flow back over the lines and repeat until you gradually build up and define the shape you want.

Draw the Octopus’ second tentacle
For the second tentacle, draw a smooth line coming off of the first, and slightly underneath it. Curve the end round to bring the line back to the centre of the Octopus.

Draw the Octopus’ third tentacle
Then, draw a smooth, flowing line under the Octopus’ second tentacle, to create the third tentacle. Each tentacle can twist or turn in whichever direction you choose.

Draw the Octopus’ fourth tentacle
Next, draw the fourth tentacle downwards, off of the third tentacle.

Draw the Octopus’ fifth tentacle
Now, you’ll draw the other side of the Octopus’ tentacles. Add the fifth fluid line down towards the bottom of the page to create the fifth tentacle.

Draw the Octopus’ sixth tentacle
Draw the Octopus’ sixth tentacle heading down towards the bottom left corner of the page. Remember, these tentacles can go where ever you feel right so feel free to experiment!

Draw the Octopus’ seventh tentacle
Next, draw the seventh tentacle up above the last one, coming out to the left side of the page.

Draw the Octopus’ eighth tentacle
You’ve made it to the Octopus’ final tentacle! Draw the eighth tentacle to the left of the oval arch. Connect it to the tentacle before and the oval arch to complete the outline of the Octopus.

Draw the Suckers on the Octopus’ tentacles on the right
Now move on to drawing the suckers. Start by adding five semi circle shapes on the bottom of each tentacle on the right side of the Octopus. If you feel you want to add more than five suckers, go for it!

Draw the Suckers on the Octopus’ tentacles on the left
Finish drawing the semi circle suckers on the Octopus’ left tentacles.

Draw the Octopus’ left eye
Before your children draw their Octopus’ facial features, perhaps take a moment to think about what kind of character they will be. Will you draw bright, circular eyes for a happy friendly Octopus, or will this be a more mischevious Octopus, with sharper eyes and a smirk? Once you’ve decided how this Octopus will look, draw the left eye.

Draw the Octopus’ right eye
Now draw the Octopus’ right eye. In this example the eyes or directly next to each other but have a go at experimenting to get create different characters!

Draw the Octopus’ mouth
Draw the mouth, under the eyes. Here, you can see this Octopus has a very smiley face but feel free to try different emotions, perhaps a frown, or a surprised open mouth, shouting away under the waves!

Draw some spots on the Octopus
You’ve reached the final stage of drawing the Octopus! Here you can experiment with adding even more character. Our template suggests adding some spots around the top and middle of the Octopus, but you could try adding different patterns or rings around the tentacles for a unique look.

Add an Under the Sea Background
Before painting your finished design, add some waves in the background. You could use smooth, flowing lines and swirls, or sharp zig zags.

Let’s Play with Colors!
Octopus come in so many different colors, and they are known to be masters of disguise with their amazing color changing skin! So, this is a great design to have fun and experiment with a range of different colors and patterns to bring your Octopus to life!
Here you can see two different colored Octopus that have been painting with bright colored acrylic paints. Wether you chose to use acrylic or watercolor paints, pencils or oil pastels to color your Octopus in, make sure to have fun with the process! There are no strict rules when it comes to adding color to your Octopus but why not take the time to research why Octopus change color and what it means?
Often Octopus have specks or spots of different color on their skin to help them camouflage with their surroundings. Maybe it would be good to try and layer the paints to create these specks? Start off with a base color and then use a dry paint brush to stipple on some flecks of a different color on top.

Let’s Play with Resist Art
To add some more interesting details to the background of your drawing, use a white crayon to draw little swirls, spots, bubbles and waves.
Now, brush watercolor paint over the top and around the white crayon. Because wax repels water the watercolor paint will add color around the white crayon but will leave a white space where the crayon has been applied. This is a super neat detail and can be really fun to experiment with!
Continue adding different shades of blue, purple and green to give the background more depth whilst experimenting with colors and paint/water ratios and consistency.
The How to Draw an Octopus Tutorial is Now Complete!
Now your Arty Crafty Kids should have fabulous drawing/painting of a Octopus!
For more under the sea inspired crafty fun, take a look at our Puffy Bubble Wrap Octopus and Black Glue Jellyfish Art

Learn More about the Flow Drawing Technique:
What is Flow Drawing?
Flow Drawing is an art technique developed by us to encourage children to understand shapes and create illustrations, in a much ‘freer’ way.
By removing restrictions, flow drawing encourages children to fully engage in the moment and discover their natural flow, making every line count and bringing mindfulness to their creative process.
You can think of the flow drawing technique as a ‘how to draw’ guide with a difference – children won’t just draw a picture, they’ll create a unique work of art, right from their soul.
Flow Drawing Benefits:
Although the process of flowing more naturally in art might seem a little alien to children at first, it’s really worth encouraging them to have a go. Flow drawing has so many benefits and helps little hands and minds to:
- Explore simple shapes and how they work together to create larger forms
- Discover their natural flow and rhythm through repetitive movements
- Learn how to combine mediums, with a fun and easy approach
- Build confidence in their own creative abilityCombat ‘perfection-seeking’ in art, providing a much needed alternative to rigid ‘how to draw’ guides
- Bring mindfulness to the creative process and boost mental health
- Foster a love of art and self-expression.