Need instructions on how to draw a frog? To your attention as many as 4 ways in a phased execution. Choose the option you .
How to Draw a Ladybug
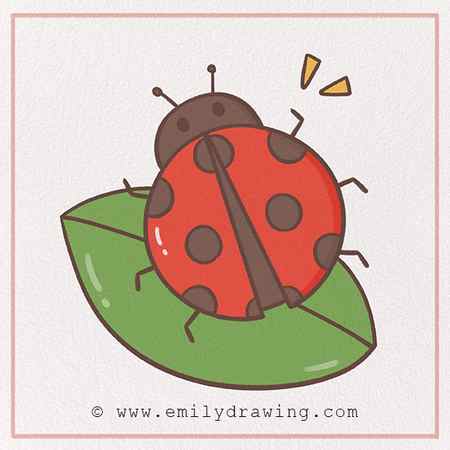
Welcome to our easy-to-follow and fun ten-step drawing tutorial! Today, we are going to draw a ladybug!
Many people around the world think of ladybugs as a symbol of good luck. Even if you don’t think they are good luck, you have to admit they are loveable, cute, and harmless little creatures.
There are about 5,000 species of this tiny bug around the world! The most well known of ladybugs are the kind with red bodies with black spots. You can see these in many places around the globe including throughout most of North America.
Most of the time when you draw a picture, you’re drawing things much smaller than they are in real life—however, this one is fun because the ladybug will be about a hundred times bigger than it would be in real life!
So, with all that said, let’s have some fun drawing our ladybug. Find some drawing supplies, and keep reading below to get started!
How to Draw a ladybug — Let’s get started!
- a piece of paper
- a pencil for the guiding lines and sketching
- an eraser
- a black sharpie or a pen for the outlines
- markers or colored pencils for coloring
- our printable drawing guide (Join my Email List below to get this Tutorial)
Get the FREE Printable Drawing Guide

Here are my RECOMMENDED Art Supplies!
- Crayola Coloring Set (140 Pieces – Mega Value!)
- 24 Colored Crayon Set
- A4 Printer Paper
- Crayola Coloring Pencils
- HP Home Printer with Instant Ink!
Time needed:
Step 1 – Draw the ladybug’s body.

Let’s start by drawing the body close to the middle of the page. Draw a curve that nearly forms a circle a few inches wide, but don’t close it entirely—leave a small gap at the bottom. We’ll fill in the gap in the next step.
Step 2 – Form the wings of the ladybug.

In the gap we left in Step 1, we’re going to add lines to show the wings. Amazingly, the wings of a ladybug beat 85 times per second when it is in flight!
To draw the wings, draw two straight lines on either side of the gap. They should extend up to the very top of the body. Check out the photo to see what we mean!
Step 3 – Finish the body.

This step is quick and easy. Draw a very small and slightly curved line in between the wings to finish off the shape of the body.
Step 4 – Draw the ladybug’s head.

Let’s add the head next. On the top of the body, draw a wide semi-circle for the shape of the head.
Step 5 – Draw the antennae!

Did you know that ladybugs can smell with their antennae? They also help them recognize surroundings through touch. We’ve got to add antennae to our bug.
Draw two lines that are about an inch long each that extend above the head, Then, draw two tiny circles at the top of each of them. Good job!
Step 6 – Add the ladybug’s eyes!

We’ve got to add eyes to our bug. Fun fact: ladybugs can only see in black and white!
In the middle of the head, draw two small oval dots about an inch apart from each other.
Step 7 – Add the ladybug’s spots!

One of the most distinctive parts of a ladybug is the spots all over their body. Did you know that the color of a ladybug’s spots begin to fade as it gets older? We need to add this unique pattern to our drawing now.
Draw several circles evenly placed throughout the body. They should each be about an inch wide. Some will be cut off by the edge of the body or wings. It doesn’t have to be perfect! Refer to the photo for this.
Step 8 – Start drawing the bug’s legs.

Ladybugs can both crawl and fly. So, of course, our bug needs legs so it can walk around everywhere. Draw six very short lines around the body—three on each side. Check out the photo!
We’re nearly done with drawing the shape of the bug.
Step 9 – Add the feet!

At the end of each of the legs, draw more small lines to resemble the feet. They can point in different directions. Check out the photo!
There you go—you’re done with forming the shape of the ladybug. Good job!
Step 10 – Color in your ladybug!
Time to add some color to your tiny ladybug! Did you know that ladybugs are so bright because they are warning their predators away? Find some reds, black, and browns and have fun adding some brightness to your drawing.
Pin it now, Draw later!

Good job! You’ve completed this drawing of a ladybug. Show your masterpiece to family and friends, and share this tutorial with them if you think they’d like it too.
Browse our site for more tutorials like these! If you liked this one, you can find a caterpillar and a lot of plant and animal tutorials. Thanks for following along, and see you next time!
How to Draw a Ladybug — Step 1

A cute ladybug that kids can easily draw. Follow the step-by-step review and everything will definitely work out. You should draw with a pencil, with light movements, without pressure. Subsequently, it will be necessary to erase unnecessary lines, and in order to do this easily, the pencil drawing should be very weak and pale.
Draw a slightly oval circle. If desired, the oval can be replaced with a circle by drawing it with a compass, as an option, circle a rounded object with a pencil.

Add a smaller circle on top, it’s in red. Note that the new contours added to the previous ones are indicated in red.

Divide the shell into two parts and draw lines – semicircular above, diverging below. Toddlers can draw one line dividing the shell in half.

Erase the unnecessary line from above, draw the antennae and circles on the shell of the ladybug.


Erase the line crossing them with an eraser.

Draw small paws on the sides.

The contour of the ladybug is ready.

Color the insect in red and black colors.
Draw a Ladybug — Option 2

The drawing is similar to the previous one, only with open wings. Using a compass, draw a circle.

From the top or side, add another smaller circle, which will be the head of the insect.

Draw open wings in the area of the large circle.

Erase all unnecessary lines crossing the wings, and a small area in the head area. Do not forget that you need to draw without pressure, then the lines will be erased without problems.
In the head area draw eyes and antennae.

Add small circles to the wings.

The contour of the ladybug is ready.

Color the insect in colors that are suitable for it, as a rule, these are black spots, body and limbs, and a red shell. The drawing is complete.
How to Draw a Ladybug Step by Step – Option 3

Here is a drawing in a funny cartoon version. But drawing it is very easy and interesting. Draw a semicircle. Or first a circle, which then divide in half and erase one part.

In the second step, draw a circle on one side of the semicircle. This will be the head of the insect.

Since this ladybug is more of a funny direction, draw huge eyes, a wide smile.

Draw antennae on the head, and 4 paws on the bottom of the body.

Round spots on the shell will complete the work.

The drawing of the ladybug is ready.

Color it as you wish.