Black is a powerful powerful colour. Versatile, it has the ability to either make your other colours pop and stand out, or overwhelm and be the centre of attention itself.
How to Colorize Black and White Video in 4 Steps
Do you want to bring your family’s old black-and-white videos back to life? Turning your black-and-white video into modern colorized footage will bring happy tears to everyone who watches them. It will be like seeing them with brand-new eyes. Today you can find many AI colorization tools that use deep learning algorithms and machine learning technology that colorize videos, providing fast and accurate results that can bring back cherished memories in color. In today’s article, you’ll learn how to colorize black-and-white videos using the cutting-edge digital technologies provided by Boris FX plug-ins and other high-quality effects. Additionally, we’ll look at some tools to colorize photos and videos using an AI model, like Pixbim Video Colorize AI, to improve your workflow and create modern-looking videos. Let’s dive in!
Step 1. Import Video Footage and Enhance Video
Upload your video footage to your video editor, such as Premiere Pro, Sony Vegas, and DaVinci Resolve. Working with a medium to high-quality original video is recommended so the final colorized video will still look professional and detailed. You can use a powered AI video enhancer to refine your video quality. You can try many editing programs, like HitPaw or AVCLabs Video Enhancer AI, or online video enhancer tools, such as TensorPix or Cutout Pro.
Step 2. Add Layers
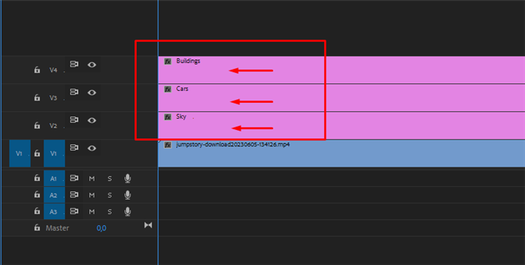
The secret to digital colorization is using multiple layers above the original video to use color correction separately and add it to a specific frame in your black-and-white video footage. Create as many layers as you need. You can start separating objects like backgrounds, subjects, clothes, etc. Try to label each layer to make it easy to identify and select the layers once you start coloring.
Step 3. Colorize Videos
Bonus Tip to Colorize Videos
How to Colorize a Black and White Video with Boris FX
As I mentioned, the key to colorization is to use intelligent and precise layer masking, then apply color correction tools and track motion to target all objects and subjects in your video. Boris FX premium tools like Mocha Pro can help you track more effectively and apply color correction filters on your preferred video editor.
Mocha Pro is a world-renowned tool for planar motion tracking, rotoscoping, object removal, image stabilization, and PowerMesh organic warp tracking.
Combining Mocha Pro with color correction Boris FX plug-ins such as Continuum BCC Colorize and BCC Color Correction or Sapphire ColorFuse will complement your workflow and make colorization easier and faster than ever.
Step 1. Set Up Your Black-and-White Video Project
Step 2. Motion Track with Mocha Pro
Using masks will help you isolate areas and objects from your videos to add color. Mocha Pro makes tracking and creating complex masks easier, saving time by avoiding unnecessary manual rotoscoping or motion tracking. You can use Mocha Pro as a standalone version or a plug-in in your video editor and export or paste Mocha masks directly to your video editor. We’ll be using Premiere Pro for our example.
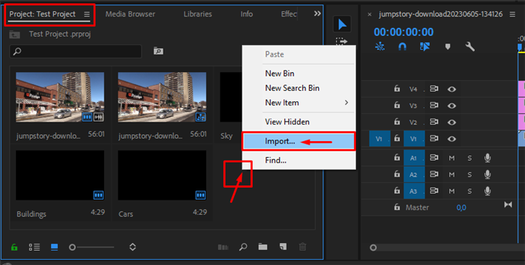
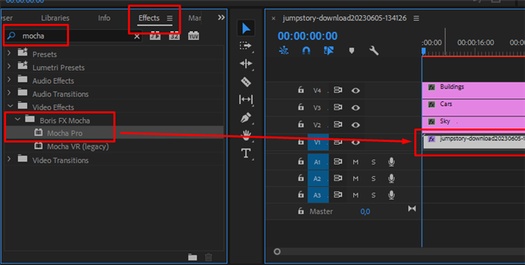
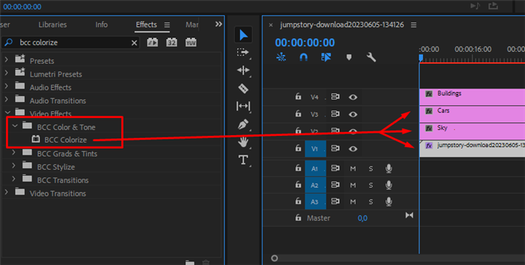
- irst, search for the Mocha Pro effect from your plug-ins and effects library.
- Drag and drop Mocha Pro to your video in the timeline.
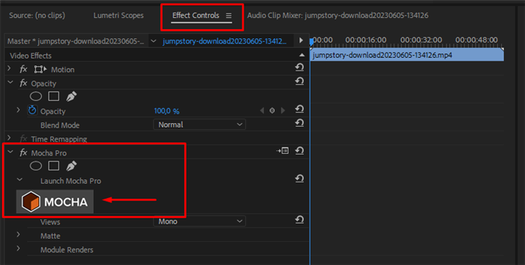
- From your effects settings, launch Mocha Pro to open Mocha’s interface. It will automatically read from your current timeline and bring your video to Mocha Pro.
- Draw masks and track with Mocha Pro. You can adjust keyframes to have perfect tracking of the objects.
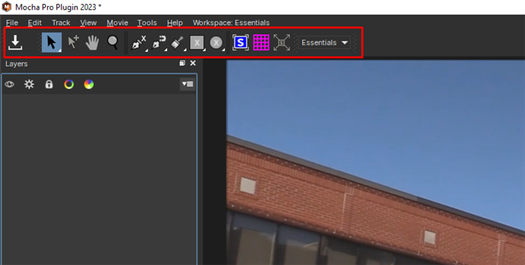
- Export your mask or select copy to clipboard and paste them as mask layers in After Effects, Premiere Pro, Sony Vegas, or any other program.
- Save and exit the Mocha project. Even though Mocha Pro streamlines the motion tracking, it still takes some time to accurately track everything in the video, especially if there are a lot of elements in every frame. Mocha Pro might have a learning curve, but you’ll start tracking much faster as soon as you understand how it works.
Step 3. Colorize Black and White Videos with Boris FX Continuum
Now you can start doing basic color correction with Boris FX plug-ins BCC Color Correction, and the BCC Colorize effect is a good start. Remember, you can layer multiple effects.
- Search for Boris FX plug-ins in your effects library.
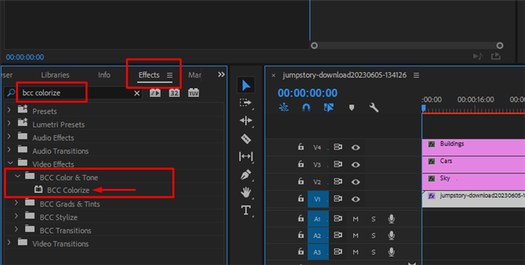
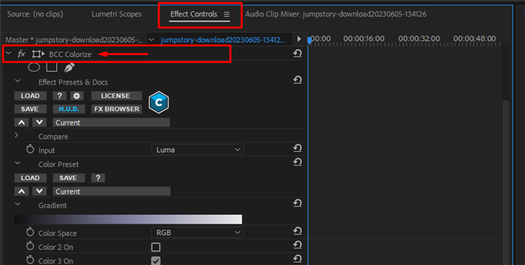
- Drag the effect to a layer.
- Adjust the settings from the plug-in.
Step 4. Add Color Grade with ColorFuse
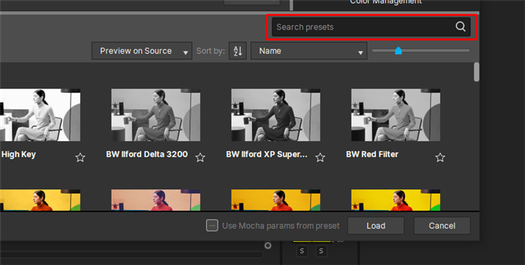
Sapphire’s ColorFuse is a plug-in to achieve instant color grading in your videos by choosing from the 50 included presets or combining up to three LUTs. Its setup is as simple as applying the effect and choosing a filter.
- Search for ColorFuse in your effects library.
- Drag and drop S_ColorFuse to the top layer to apply the effect to the entire video.
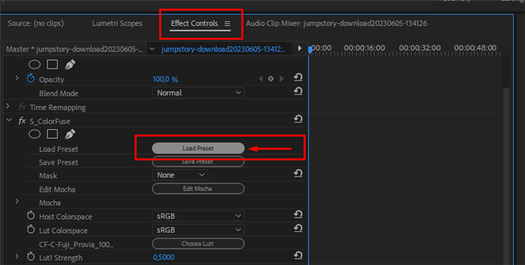
- Select a preset to add a cinematic color grade effect.
Bonus Tip to Colorize Videos
5 Best Tools to Colorize Black and White Photos
Although the methods we just saw can be tiresome, the control you have over the final output video is magnificent. However, there are also many quick solutions that, even if they’re less customizable than manually coloring black-and-white videos, provide a decent result.
Here are the five best tools to colorize your black-and-white photos.
1. Optics by Boris FX
Optics by Boris FX offers masking and painting tools to replace backgrounds, isolate colors, colorize old sepia and black-and-white pictures, and fix and restore old photos. It’s a tool that beginners will find easy to use, but it also includes features to manipulate images, design graphics, add lighting effects, and create unique photo animations. If you combine it with the professional effects from Sapphire and Continuum collections, you’ll have total control over color correction and colorization customization, and mastering it will give a whole new dimension to your editing skills.
Pros
- It’s available as a plug-in for Adobe Photoshop and Lightroom and a standalone version.
- Simple masking tools.
- It comes with thousands of presets ready to use.
- Support Wacom tablets.
- Fully customizable.
Cons
- You need to adjust the color correction manually.
2. Photoshop Neural Filters: Colorize
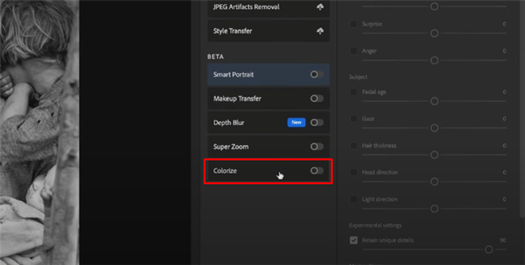
Photoshop’s new workspace, Neural Filters, allows you to use machine learning powered by Adobe Sensei to improve and simplify your colorization workflow. With the Colorize filter, you can quickly restore your old black-and-white photos and bring them back to life, allowing you to customize and adjust settings like saturation, color balance, and noise reduction to ensure the output of your photo looks more realistic. You can optimize colorization in a specific area in your photo, such as the sky or nature elements, and further adjust other attributes.
Pros
- Easy to use with one click.
- Customization.
Cons
- You are required to have a copy of Adobe Photoshop CC 2020 or above.
3. DeOldify
DeOldify is an open-source tool to restore and colorize black-and-white videos and pictures. It’s available for free as a Google Colab notebook. You must be logged in with your Google account and upload your photo to a host site. Follow the instructions in the Google Colab notebook. After a few clicks, you will have your colorized black-and-white photo ready to download.
Pros
- Offers photo and video AI colorization.
- Free and open source.
- Easy and quick.
Cons
- Not suitable for videos longer than 20 minutes.
- The user interface is a bit clumsy.
- You must upload your photos and videos to a video or photo-hosting site.
4. Repairit AI Photo Colorizer

Repairit is an online photo colorizer that uses AI algorithms to colorize black and white photos. It also can repair your old picture before colorizing it to fix imperfections in photos and enhance face detail. After uploading your black-and-white picture, Repairit will automatically add color and provide you with three results. You can preview each option in a divided view and select which one to download, or you can download the three versions for different purposes.
Pros
- Free and easy to use.
- Offer multiple color options.
- Quick repair and AI colorization tool.
Cons
- No customization options.
- You need a Wondershare ID to download your colorized photo.
5. PixBim Color Surprise AI

Using the same technology as Pixbim Video Colorize AI to colorize black and white photos, Color Surprise AI colorizes your pictures allowing you to adjust attributes such as the color factor to control quality, temperature, color intensity, contrast, and gamma correction. The color correction brush tool lets you adjust the colors of the already-colorized photo to personalize the looks of the image further. Finally, you can save your photos in JPG, PNG, or TIFF format.
Pros
- Easy AI colorization.
- Free trial.
- Customization.
- Batch process to colorize multiple photos.
Cons
- Requires installation.
- Runs as a standalone software only.
Defining ‘pure’ black
Let’s start with defining the colour black.
Unsurprisingly, black is the darkest of all colours and is created by 100% absorption of visible light and the reflection of none.
In theory, a black hole is a perfect definition of black, as its gravity is so strong, light can’t escape it. But in reality, perfectly black entities almost do not exist.
Therefore, we consider objects “black” when there is an absence of reflected light.

This is why it’s hard to create a good black on an LCD screen – even when the black pixel is ‘switched off’ and has no light, the screen is still backlit. This turns the black into more of a grey colour.
The problem with blacks in printing
Black should be easy to obtain, right? Just slam all the colours up to 100 and be done with it, right?
Well, no. But also, yes.

The printing world runs on the CMYK colour palette – C – cyan, M = magenta, Y = Yellow and K = Key, or black.
These colours are mixed together as a percentage to achieve the desired colour.
For example, fire engine red is:
C – 0%
M – 84%
Y – 80%
K – 19%
Turning all these percentages up to 100% will give you black that’s kind of dull, washed out and not very black at all.
There are a few other reasons that all values set to 100% aren’t used:
- All values at 100 are a massive waste of toner, and therefore money
- Even waste from water-based and solvent-based inks has an impact on the environment
- Excess ink takes excess time to dry
- Printouts will be physically heavier from the excess ink
This results in some pretty bad packaging and adds unnecessary financial expenses to the end product.
Note: CMYK values set to 100% is called “Registration Black”. It’s used to calibrate machinery and line up different print layers.
Using blacks in printing
The CMYK printing process is a summative environment – that is to say, the final colour is a blend of 4 others.
Black can be achieved in 2 different ways.
Regular black has CMYK values of: C = 0, M = 0, Y = 0, K = 100.
Rich black uses CMYK values of: C = 60, M = 60, Y = 60, K = 100.
Some print houses adjust their 60 to another value, usually between 40 and 70.
But if black is a result of all colours being absorbed, why wouldn’t you just set all values in the CMYK colour range to 100?