Alternatively, you can use them as embroidery patterns or draw inspiration for those delicate fine line tattoos.
Coloring methods for an owl
Coloring without blending
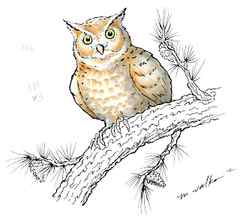
I have been working on a mural for a local elementary school, and they want to incorporate in their mural some owls. So, I have had to do a lot of owl sketches recently. While the final mural will be much simpler and stylized, I wanted to share a realistic sketch that I made for practice. I am marking this post as advanced mostly because without blending, your stroke technique is what will define patterns and textures.

As this is just a personal sketch, and not for the client, I wanted to color it simply and more for my own reference. So, as with many of my personal sketches, my goal is to work quickly and with a limited color palette. Blending takes time, so I wanted to color this owl without blending and show you how I use the marker strokes and layers to create the suggestion of blends.
The first layer of color is E31. Notice how I used short, stubby strokes from the side of the brush to give the illusion of feathers on the chest. Then, for the more delicate feathers around the face I switched to the tip of the marker and used very small fine strokes. My goal in this layer is simply to define feathers.
Next I added a layer of W3 for shading. I layered it over the E31. Notice on the chest, how I added the gray in stubby strokes as well, instead of just flatly coloring. I tried to define a light source at this point. The reason I added gray after the brown is because I knew that when the gray layered over the brown it would soften my strokes without the need for blending. I also colored the eyes with Y02. I shadowed the eye with E31.
So my first layer of color was for basic texture definition. The second layer of gray is to show shadows and shape. The next layers of color are to add contrast.

Now I add a layer of E44 to begin defining the unique markings of the owl. The slightly darker brown starts to pull out contrast and shape. Notice that in the chest area, I used the darker brown in strokes opposite the lighter ones. I did this to mimic the pattern of the feathers a little more. The darker brown strokes on the wings really start to define feathers.
Last, I add the dark gray markings from this owl variety. I used an N7, since it was the right darkness, and I didn’t mind that it was a little cool for the bird. I probably should have used a W7 or T7, but that would have involved me getting up from my desk to find the right color, and I am rather lazy.

The contrast and markings may seem a little strong at this point, but remember, the surroundings will help tone it down after they are colored. So, for the owl, I used E31, W3, Y02, E44, and N7. No blending, simply layering.
On the final image, I colored the sky with BG70 and B41. The tree in the distance is drawn with W1 and YG61. The branch he is sitting on is colored with the same colors as the main owl, with a hint of YR14 to change the tone to make the image not feel too flat. I colored the branch in scribbles to accent the irregular texture of the bark.
I did add a few hints of B45 onto the owl to cool down the shadows and pull in a bit of the sky color. Still, no blending.
I hope you enjoyed today’s tutorial. Have a wonderful week!

Posted by marianne walker at 10:31 AM
Labels: advanced
10 comments:
Carly said.
gorgeous! thank you so much for sharing!
Tamytha said.
Stunning! I keep buying the markers, but haven’t been brave enough to actually start. You make it seem so simple. Thanks for the inspiration.
Maire Gamber said.
Just wonderful! I will practice! I just love your tutorials! Thanks!
Hugs,
Marie
Linda said.
Gorgeous. Love it so much, thanks so much for sharing your amazing talent with us, I really appreciate it so much. You are such a wonderful inspiration.
Patricia St Martin said.
Love how you did the Owl. I tried one and really over colored him. Love your inspiration.
Ellen Taylor said.
Wow! Your coloring amazes me!!
Barb said.
WOW – this is great. Thanks for the tutorial and sharing your knowledge and talent with us. You inspire me so much!!
Jean said.
I really loved the shadow of another branch in the background. I finally understand the contrast, contrast, contrast that you told us about on Thursday in the class.
Barbara said.
totally amazing! Thanks!
Renate Krogdahl said.
I just recently discovered your blog. All i can say is AMAZING. Thanks for all the wonderful resources you have on here! Lots to learn.
Subscribe to: Post Comments (Atom)
About Me
marianne walker Eugene, OR, United States I am the North American Product Director for Copic Markers, working at Imagination International, Inc. I have written 4 books on coloring with Copics in conjunction with Colleen Schaan. I used to design stamps for Our Craft Lounge. The things I post on this blog are my personal opinions or techniques I have come across over the years- I will try to give credit where credit is due. These ramblings do not necessarily reflect the general opinions of Copic Markers/Imagination International Inc. my direct e-mail is [email protected] View my complete profile
ABS/Airbrush System- Copic Airbrush System. Works with either a compressor or Copic aircans. Uses either Sketch or Copic Markers. 1 2 3 4 Troubleshooting
Alcohol Markers- Copic markers are alcohol (ethanol) based dye markers, that are known for being low-odor and giving smooth, vibrant colors. Since they are a dye, they will fade in bright lights, but they are acid free on most surfaces. Anything with alcohol in it will react with these inks. Any Copic marker type is refillable with replaceable tips. They will not cause paper to pill when going over it many times, nor will they dissolve photocopies.
Blender- The Copic Colorless Blender pen/ink. This is ethanol based and is not the same as blender pens from other companies. Used for fixing mistakes, making colors lighter and for special effects.
Booster- A needle that attaches to an ink bottle that makes it easier to refill dry or empty markers.
Ciao Marker- Round body Copic Marker. Super Brush nib/Medium Broad nib standard, Medium Round nib optional. Refillable. 144 colors. Cannot airbrush.
Color Family- The letter at the beginning of your color name (B, BV, V, RV, R, YR, Y, YG, G, E (earth), F (Florescent), Grays & Blacks: C (Cool Gray), N (Neutral Gray), T (Toner Gray), W (Warm Gray) 100 Black, 110 Special Black
Color Saturation- This is the first digit on a color name. Colors that are 00’s, 10’s, or 20’s will be more vibrant (B05, G16, R29), while colors that are in the 70’s, 80’s or 90’s have more gray added (B95, BG78, G94) and are closer to the neutral/earthy end of the color spectrum. Note: E (Earth) markers don’t necessarily follow this rule.
Color Group- A sequential group of colors within one color family with the same first digit (i.e. E30, E31, E33, E34, E35, E37, E39) where numbers ending in 0 are the lightest and 9 is the darkest, also called Natural Blending Group
Copic Certification- These are classes for teachers, store owners, or designers who want to learn techniques and advanced tips on using Copic markers, Airbrushing, etc. for papercrafting. Each class is about 7 hrs, and will be held regionally. Check here for listings of upcoming classes.
Copic Marker- This is the original, square body-style marker. Standard Broad/standard fine nibs, 7 optional nibs. Refillable, holds the most ink to start with. 216 colors, empty markers available. Airbrush Compatible
Multiliner – Fine Line inking pens by Copic in 9 different sizes, 5 colors, plastic disposable body design. Pigment based, archival, acid free. Will not bleed with Copic markers (on non-glossy paper)
Multiliner SP – Fine line inking pens by Copic in 10 different sizes, 12 colors in two sizes. Aluminum body, refillable with replaceable tips. Pigment based, archival, acid free. Will not bleed with Copic markers (on non-glossy paper)
Opaque White- Thick white, waterbased paint applied with a brush after you are done coloring with markers. Used for adding highlights and accents into a completed picture.
Sketch Marker- The most popular marker type. Super Brush/Medium Broad nibs standard, Medium Round nib optional. 322 colors, empty markers available. Airbrush compatible- 2 spray patterns
Spica Glitter Pens – also called atyou Spica pens. These fun, pigment based pens are filled with micro glass flakes, giving a very subtle, elegant sparkle. Keep stored flat, though if they are giving you troubles, try storing them point down overnite.
Wide Marker- Large, background marker. Extra Broad nib standard, Broad calligraphy nib optional, 36 colors, empty markers available
Various Ink- Also called Refill Ink or Re-inkers . Each bottle holds 25 cc’s of ink. 322 colors available, empty bottle for mixing custom colors also available. Great for making alcohol ink effects, such as Faux Stone or covering large areas. When you see streaking in your work it’s time to refill. You can refill directly from your bottle of ink, or you can use a booster needle. Try not to overfill.
For refilling dry markers: Ciao- add 1 to 1.5 cc’s ink Sketch- 2 cc’s Copic 2-3 cc’s Wide 3-4 cc’s
Using this site for Classes
The content from each post is intended as tutorials and directions as well as useful information. If you would like to use these tutorials in a workshop you are more than welcome to, just give credit to this blog site and other suppliers mentioned in each post.
Thank You!
Marianne
Owl Coloring Pages for Kids
These owl coloring pages make a fun activity for both kids and adults. There are many feathers to color any shade you want, and you can even create your own background for the owl! If you want even more pictures to color, check out these honey bee coloring pages as well.
Coloring can be a very relaxing activity for not just children, but adults as well; it’s a great way to wind down at the end of the day, especially with some nice music turned on.

Owl Coloring Pages for Kids & Adults
Click here to download and print these free coloring pages:
Download Owl Coloring Pages here!
Use your favorite crayons, pencils, paints, and markers to color these owls. If you would like to see me color an owl on Facebook Live with Prismacolor Colored Pencils, then check out the video below:
These coloring pages were made by me. To see more of my artwork, check out my Instagram. You can also watch Facebook Live videos of my drawing and coloring during weekdays on Quirky Momma.
I hope you enjoy coloring these owls!
How to Color an Owl Instructions
Hi guys, it’s Natalie. Today I’m going to color this picture of an owl that I drew. To color it, I will be using Prismacolor colored pencils. They come in packages like this, you can get them at a craft store such as Michael’s or Hobby Lobby, and you can find them on Amazon as well.
The paper that I’ll be using is Strathmore toned gray paper. Again, you can find this at craft stores and on Amazon. And I’ll also be using a little touch of white paint for reflections in the eyes and I’ll be using a Copic multiliner which is just a regular ink pen you can find those at craft stores as well.
I’ll actually be starting with this ink pen because I want to color in the pupil of the eye so I can get a true dark color. [0:51] While this ink pen is very thin, unfortunately, it is the largest one that I have. So it may take just a moment to fill this in.
[1:06] If you guys have any questions, feel free to ask them and I will answer them. If I don’t answer them right away, try asking again because it’s really difficult to see all the questions at once since they move off the screen rather quickly.
[1:58] Like I said, this is the largest ink pen that I have. So this may take a moment. [2:24] After finishing that, I will begin on the coloring of the eye. And the color of the owl’s eyes they will be yellow. So I’m going to use a few different shades of yellow. First, I’m going to use this bright canary yellow for the brightest part of the eye and then it will eventually transition into more of a golden color as it reaches the darker part.
[3:05] Leslie asks, “Do you use water on your pencil tips?” I do not. I’ve heard of that technique, but I’ve never actually used it myself.
[3:30] And here’s more of a golden yellow that I’m adding. I didn’t want to just use the same yellow. I think that the variance in color is really important and it can really make a huge difference in a piece.
[4:09] In here we have an even darker yellow. You may not see the immediate difference in the video but it definitely does add another dimension to the yellow.
[4:40] And I add a little bit of black just to the shaded parts of the eye. [4:57] And after adding the black, you can shade it over with one of the yellows again. This is more of an orange but it helps enhance the yellow. [5:27] And I’ll do the same for the other eye. [5:38] I think I need a little bit more black right here.
[6:00] Christy asks, “Do you ever mess up coloring and have to start over again completely?” That happens to me on occasions. Sometimes I’ll start coloring something and just the way that I colored it was just wasn’t working out. And I felt like I had to scrap it. However, usually, I don’t like to color the darkest color first or do too much damage to the point where I need to do that. But on occasions it does happen and it sucks but you learn from your mistakes in doing so.
[6:45] And I’ll add a little touch of white with the pencil right here. [6:54] And the same right there. [7:01] And I’ll color the area around the eye, on this particular owl it has black around its eye.
[8:14] Someone asks, “How long have you been doing this?” I’ve been coloring and drawing since middle school. However, I’ve been focusing on drawing people and animals in about…probably I started doing that my freshman year or late eighth grade. If you guys want to see more examples of my work and other things I do, please check out my Instagram. The link to that is in the video’s description.
[9:35] After drawing some of the outer eye, I guess, like coloring. I’m going to color in the beak, just to get these objects out of the way for whenever I start on the fur. And for the beak I’ll be using black, gray and white color. Let me look at the gray, it’s [9:56] another short pencil of mine.
[11:23] To shape something, it usually is a repetition of layering different colors. Like right now I’m doing that with gray and black. I do it until I get the desirable pattern and shade. Until it creates that illusion of depth that I want to help form the owl’s beak. And after the gray and black, just add a slight touch of white to give it a little bit of shine.
[12:00] And I think how I’m going to shade this entire owl and its feathers is, I’ll start from these facial features. For example, I’ll workout outwards from the eyes and outwards from the beak and I’m going to start doing that.
[13:20] On top of using black and white for the feathers I’ll also be using browns. However, if the part that I’m working on there isn’t that much brown, I think I will use a little touch of brown between the black and the white to enhance the coloring and help connect it with the rest of the owl. Because up here and around its eyes there will be a lot more brown for the coloring.
[14:22] Whenever you shade fur or small feathers, a good tip for shading is to pay attention to the direction that the hair is flowing. For example, on this owl, the facial feathers are rather small, they’re flowing in one direction which is going downwards this way on the owl. So to shade that, hold on let me put down some more white so I can show you. Hopefully you guys can see it well. Unfortunately, I can’t zoom in on this once the video has started recording. But a good tip is to form almost like little triangles without the face and have the tip of the triangle point in the direction that the hair or feathers is flowing. This can apply to many other animals as well, that you draw.
[15:10] It’s just a good little tip for drawing fur. [15:18] The triangles don’t even have to be complete but basically just create strokes in that direction. And sometimes they do form triangles because the hair or fur, hair, fur, feathers, whatever, they’ll clump together.
[15:56] To answer Madeleine’s question, whenever I draw things like realistic animals, I always use pictures because, for example, I haven’t drawn owls enough to draw them from my memory. However, people I can begin to draw from my memory. They may not look like anyone in particular, but I can definitely assemble faces from my memory. However, things like this, I can’t because they just haven’t drawn them enough. [16:24] But if I spent all day drawing owls I think I could.
[16:39] A reminder for all the viewers, I have an Instagram and the link to that is in the description of the video. Be sure to follow me and if you have questions, you can send me a message on Instagram or if you’re interested in purchasing artwork from me, send me a message as well.
Don’t comment on my photos to ask for things like that because it’s likely I won’t see them because I’ll have so many notifications.
[17:25] Grace asks, “Is drawing eyes one of your faves?” I would say definitely, I really enjoy drawing eyes just because they’re so vibrant usually. And they’re so smooth a lot of times yet, you can find a lot of neat patterns in them, especially if you look up close on a drawing of an eye. I drew a picture of a human eye, I think a week ago. it’s on Quirky Momma, if you look around you can find it. You can definitely see the patterns I drew in it, but that was a lot of fun. I really like drawing eyes for that reason. I think a lot of people like drawing eyes. Tell me guys what do you think? Oh, tell me, what did I say? Tell me what you think.
[19:02] Oh Sophia, I use Prismacolor colored pencils.
[19:17] Another thing to remember whenever you’re drawing feathers or fur, hair or whatever, make sure that your pencils are sharp because you can make a finer line and overall, that will enhance the quality of your drawing.
[20:49] To answer Pete’s question, “How long have you been drawing?” I’ve been drawing since middle school. However, I started painting and sketching people and animals like this in ninth grade.
[21:22] Shaolin asks, “Have you ever drawn yourself?” I have before for an art project at school. However, I don’t know what I did with that picture. I think I lost it or it’s somewhere in my closet, the shelves act like storage for my old art. I’ll have to look for it.
[22:43] Aaron asks, “What’s the hardest drawing you’ve ever done?” Um, I’ll have to expand drawing to works of art. And I’d say the hardest piece that I’ve worked on is a painting that’s not quite finished yet. It’s of a robot and a person, I haven’t posted it on Instagram yet. However, I hope to because I really like the painting. Yet, I’m not done with it because I keep painting over some of the facial features on the person because I just can’t seem to get it right to a point where I like it. And that’s something that happens to me sometimes is I just get frustrated with attempting to paint certain facial features and it can take a while. But in the end, the results are typically very rewarding. So I can’t wait to show that painting to you guys once I finish it.
Hopefully that will be some time soon.
I need to start working on it again. I started earlier this year, however, I’ve taken a break from it. And I think sometimes it’s good to distance yourself from a piece that you’re working on. And you’re starting to get frustrated on, because it’s good to come back to it. I would come back to it with a fresh mind.
[24:00] To answer Monica’s question, “What are your favorite things to draw?” My favorite thing to draw would be people. I really like drawing human faces, human bodies, just anything human. It’s just, I feel like it’s a good accomplishment.I feel because sometimes a human body can be very difficult to draw, yet at the same time, it’s very rewarding. And it’s just so relatable to me. I mean, cuz it’s a human, like, What? What can be more relatable?But I really enjoy drawing . If you want to see examples of my human drawings, you can check out my Instagram. I have tons of pictures of that. In fact, that’s probably the vast majority of the art that I make. I think that kind of answers another question. Laurie asked, “Do you draw people too?” Yes, I draw people if you want to see it, go check out my Instagram.
[25:15] On the owl’s forehead, this picture of an owl. The owl has tons of different colors of feathers. It’s a mixture of white, brown and black. So I’m just going to start drawing some feathers sticking out in different colors. Right now I’m just doing black, and then I’ll come in with white or brown. I don’t know which order but [25:38] I will do that.
[26:16] Someone asks, “How long does it typically take you to reply to an Instagram message?” I can say. Hopefully, if you send me a message tonight, I can reply tonight. However, definitely, if you send me a message tonight I will be on Instagram tonight checking. However, if you send it any other time, sometimes my phone doesn’t notify me of new messages. It’s kind of weird, but I’ll have to check my notification settings, but I will get to it within a day or two. So don’t worry.
[28:01] Hopefully this weekend, I’ll be able to go to Hobby Lobby or Michael’s and buy myself a new black Prismacolor pencil because this is very short and it can be rather difficult to apply pressure sometimes because it’s so short.And if I want to apply lots of pressure, I really have to do this [28:20] and I can’t always see what I’m doing so it’s not as precise. [28:24] But I do like to use all the pencil, get the most of my money for it because Prismacolors can be a little pricey..Whenever you’re sharpening your prismacolor pencils, now this is something that I’m going to try to talk about in all my videos for those who don’t watch them all. But whenever you sharpen them, try not to use the plastic pencil sharpeners that you buy at Walmart or Target just for regular like number two pencils that you would use for school.
I would highly recommend getting a metal pencil sharpener like this. However, there’s a more efficient method to sharpening pencils and I think it’s called shaving. But it basically involves using a blade, such as the blade of an exacto knife and shaving the pencil to get a sharper tip.That way the waste is minimized and there’s a smaller chance of it breaking inside the sharpener. However, this method can be dangerous, so I wouldn’t recommend it to younger viewers out there. But if you do want to do that, have a parent help you if you’re young and don’t know how to use that. I highly recommend getting a metal sharpener over a plastic one.
[29:39] Oh, shout out to Nicole, Elle and Holly. Hi guys.
[30:16] To answer Christy’s question, “Have you always loved or did you learn to love art?” Honestly, all my life, I can say I’ve loved art. I think my love of art is what got me into drawing art because I’ve always loved to look at art. Especially looking at art online and seeing people make amazing things. Whether it be just like a realistic drawing of something or fanart of characters that I loved. I just thought it was the coolest thing ever. And the art itself kind of inspired me to get into drawing, because I wanted to make things like that myself. So I taught myself how, I did a lot of practice. I took art classes in Middle School, and I’m currently taking them in high school.
Next year will be my last year of high school and I’m currently enrolled in IB Art, which is Trevor International Baccalaureate. It’s a really cool international education program. And through the art class, you get to submit a portfolio along with a workbook.And it’s super fun. It’s not really instruction based, but it definitely is a place that gives you an opportunity to talk about art with your peers and teacher on a deeper level than just like discussing visual properties. Because a lot of what we do in IB art is focused on analyzing the why behind the art, which I think is definitely extremely important. And it’s something that can make art more powerful. And that’s one of my goals for art is to make my art more meaningful. I mean, the drawings I’m showing you guys is mostly for technique and kind of like the wow factor of drawing animals. However, some of my other works, I tried to put more meaning into it.
[32:01] “Have your drawings ever been exposed in some kind of art fair?” [32:06] I’ve had a couple of my drawings in art shows that were for my school district. However, that’s pretty much it. Mostly things around my school, the city that I live in.There’s a few art galleries that we have and there will be times where for example, an entire month will be dedicated to youth art. And the schools will submit pieces and mine are in there. It’s really cool to go to these [32:32] little art shows and see your own art on the walls.
[32:45] Holly, yes. I buy my colored pencils in a pack. Well, actually, I didn’t buy these in a pack. They were given to me as a gift. They’re second hand. But if I were to have no pencils, I would definitely buy them in a pack if I’m buying tons of colors. Because it’s the most efficient way to purchase them, you’ll save a lot of money doing so. However, if you’re just getting started or you want to buy just one color, you can buy them individually. If you buy them individually, I think they cost around $1. 75. I’m not sure I haven’t bought one in a while. I need to though, I’ll get back with you guys, whenever I go to do that I’ll have more accurate pricing.
Whenever you go to craft stores, you’ll find these displays with small little cubbies and in each cubby is a different color. You can pick out colors that way. Or if you know the name of the color that you want, you can look it up on Amazon and purchase it. Some must haves for drawing I would say definitely black and white. Then I’d say choose your favorite color if you’re just getting started because whenever you’re just getting started with a new art medium, it’s good to choose colors that you really like. For example, whenever I test out paints, I’ll pick out my favorite color which is like a turquoise color because it’s just fun to mess around with and [33:57] paint with. [33:59] You know, test your Favorite color. That’s what I recommend.
[34:32] Michelle asks, “Can’t you get a pencil extender for your short pencils?” Yes, you can. I would recommend doing so for you guys watching. I would do it but I don’t have one. And I haven’t been to the craft store in awhile. So that’s definitely on my craft store shopping list. However, I’m not too familiar with using them. I think I used them once in middle school. I don’t know if you’re able to apply the same degree of pressure because I know that It appears to be pretty stable because it grips the pencil but I’d have to try it and tell you guys what I think of them.
[37:56] Oh Trina asks, “What is a good beginner pencil for my youngest daughter?” [38:07] Let’s see, Trina. How old is your daughter? And are you looking at just regular sketching pencils or colored pencils?
[38:49] Okay, so she’s 12 years old. I would recommend getting her just a set of typical, I guess you could say, generic colored pencils. But get them from a craft store because usually craft store pencils even if they’re an inexpensive set. I don’t have any particular names for you because you can find them anywhere. But even if it’s not like an expensive set, it’s still good to introduce her, for her to get used to coloring different things. But I would also say get her a couple of Prismacolors. I would say just get a black, a white and maybe a gray. Just give her a couple so she can get used to blending and know the power of blending pencils, it can be a really cool feeling and it can inspire her to go and use more of them. I know a lot of kids as young as 12 that use Prismacolors.
[39:42] It’s just a matter of getting used to it and learning to color with it. And the best way to do that is to actually use them so I would give her a couple of them. I wouldn’t go out and buy an entire set right away because it can be really expensive and if she ends up not liking them, then that’s a huge loss. But definitely start out with a few of them, at craft stores you can buy them individually. So just pick out a few colors, pick out a black, a white and her favorite color.
Owl facts
For those who are new to my coloring pages, it’s important to note that I aim to provide you with an educational experience alongside the joy of coloring.
I believe in offering you the opportunity to learn about the subject matter, allowing you to seamlessly transform your coloring session into a valuable lesson.
So, without further ado, let’s delve into the educational journey together!
Here are some fun and interesting, simplified, facts about owls (my reference source can be found here):
- Owls belong to the order Strigiformes and are found in various habitats worldwide.
- With about 220 species, owls are incredibly diverse, ranging from tiny owls weighing a few ounces to larger species weighing several pounds.
- Owls have unique adaptations for hunting, such as specialized feathers for silent flight, exceptional night vision, and incredibly acute hearing.
- Unlike most birds, owls have forward-facing eyes, providing them with binocular vision and excellent depth perception.
- Owls have a remarkable ability to rotate their heads up to 270 degrees, allowing them to scan their surroundings without moving their bodies.
- Many owl species are known for their distinct calls, which vary from hoots and screeches to whistles and hisses, serving as territorial communication or courtship displays.
- Owls have an exceptional sense of hearing due to their asymmetrical ear placement, allowing them to locate prey with pinpoint accuracy.
- These birds of prey primarily feed on small mammals like rodents, but their diet can also include insects, fish, birds, and even other owls.
- Owls regurgitate pellets composed of indigestible materials, such as bones and fur, after consuming their prey.
- Owls have soft feathers with specialized edges that reduce noise during flight, enabling them to approach their prey silently.
- Many owl species have camouflage plumage, helping them blend seamlessly with their surroundings and remain unseen by both predators and prey.
- Owls are known for their nocturnal habits, but some species, known as diurnal owls, are active during the day.
- Owls have been revered and feared in various cultures throughout history, often associated with wisdom, intelligence, and mystery.
- The barn owl is one of the most widespread owl species and can be found on every continent except Antarctica.
- Some owls, like the snowy owl and the great gray owl, have adaptations to survive in cold, snowy environments.
- Owls play an important role in controlling populations of rodents and other small animals, making them valuable for natural pest control.
- The eyesight of owls is incredibly sharp, and they have a higher number of rod cells in their retinas, which enhances their ability to see in low-light conditions.
- Owls have strong, sharp talons for capturing and gripping their prey effectively.
- Owl courtship rituals can involve elaborate displays of flight, calls, and gift offerings.
- Despite their hunting prowess, owls face various threats, including habitat loss, climate change, and collisions with vehicles and structures.
These facts provide just a glimpse into the fascinating world of owls.
Their unique characteristics and behaviors make them truly remarkable creatures worthy of admiration and study.
If you would like to continue on your quest for owl knowledge, here are some other reputable resources to learn about them:
- https://kids.britannica.com/kids/article/owl/353584
- https://www.audubon.org/news/13-fun-facts-about-owls
- https://www.pbslearningmedia.org/resource/idptv11.sci.life.oate.d4kowl/owls/
- https://www.nature.org/en-us/get-involved/how-to-help/animals-we-protect/owls/
- https://fpdcc.com/five-fun-facts-about-owls/
- To see all of my free printables, go here.
- To see an alphabetized index of all of my coloring pages, go here.
- To see all of my Animals coloring pages, go here.
- To see all of my Birds coloring pages, go here.
Printing instructions
*Keep in mind that while these coloring sheets are free, they are for personal use only. Any additional use will need written permission, from me, obtained via email. Thanks.*
How to get best results with your owl printable
Prep Time: 2 minutes
Active Time: 3 minutes
Total Time: 3 minutes
Difficulty: Beginner to Intermediate
From writing practice worksheets, to various fun designs, there are owl coloring options for everyone. plus, there’s a built in lesson too.
Materials
- Black Ink/Toner
- Standard 8.5″x11″ Printing Paper (or quality cardstock)
Tools
- Printer
- Computer/ Phone/ Or Tablet To Download To
- Colored Pencils
- Pencil Sharpener
- Eraser (optional)
Instructions
- Explore the array of coloring page options and select the image or images you wish to color. The displayed sample image(s) on this page, featuring the website’s watermark at the bottom, provides a preview of the complete PDF image’s appearance.
- Look slightly below the desired sample image to find the “download here” button for the attached PDF file.
- First select download, and then select the option to print.
- Once you’re prepared to print, ensure that you choose the highest-quality print setting that’s available.
- Now select “print” and send it to your desired printer of choice.
- After completing the printing of your coloring sheet(s), allow a few minutes for the ink to completely dry while it remains on the printer tray. This additional step will help prevent any smudging of ink on your coloring page, which is particularly crucial if you intend to gift your artwork to someone special.
- Before you begin coloring your work of art, please make sure your hands are washed well and completely dried. Next, find a clean, level surface on which to place your paper, and then let your imagination run free as you color to your hearts content.