Deven Hopp is an experienced writer and editor with over five years of experience covering the beauty industry for sites like Byrdie and Makeup.com. She is currently the brand director for Versed Skincare.
The Trick To Using a Round Brush That No One Knows
Patricia Shannon gives how-to content a can-do attitude, sharing her knowledge and research on housekeeping, decorating, gardening, etiquette, beauty, and more. She has been writing and editing lifestyle content for more than a decade.
Updated on May 25, 2022
We’re always hearing about new ways to perfect the at-home blowout and finally achieve salon-worthy results. News flash: We have never once found this to be true. I mean, we can achieve a nice blowout at home, but salon-quality? Not quite. We’re not going to tell you that these tips will help you finally master that salon blowout at home so you can save your $50 for other pursuits, but we will say that these little tricks will most assuredly step up your home style—substantially. The amazing things is, they all revolve around one tool, and it’s not your blow dryer. Enter the round brush. It’s a magical item that can be worthless unless you know how to use it the right way. If learning how to use a round brush was something Mama passed down to you on your first day of kindergarten, this article probably won’t tell you anything you don’t already know. For those that play a losing battle with this rotund tool each morning, prepare to have your life changed—or, at least, just your hair game.

Don’t Use It Until Your Hair Is Almost Dry
Beware: You’re arm will feel like it’s about to fall off if you start using your round brush too soon. Hair will be easier to manage and style once it’s mostly dry, plus you’ll save valuable time.
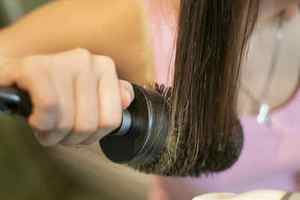
Depending on your hair length, you’ll most likely want to start with a medium-size round brush. Our pick for the best round brush is this version from Harry Josh Pro Tools. Its firm boar and nylon bristles grip the hair enough to pull it taut, while the wooden handle is sturdy and easy to manage.
Now, If You Take Only One Tip, Let It Be This
When you’re using your round brush, it’s important to work by small sections that are wrapped around the brush once. The wrapping part is the most crucial technique when learning how to blow dry hair with a round brush. If you wrap more than once you’ll likely get the brush stuck in your hair (ouch—that’s the kind of mistake you only make once), and giving it a half wrap will only result in curled under (or out) ends—not the loose wave we’re aiming for.
Wrapping each section around the brush once is the one thing that entirely changed my at home blowout result. Give it a try for yourself and you might just find you’re one step closer to that salon-worthy blowout you’ve been trying to master for years.
How to Pick a Round Brush
Not all round brushes were created equal, and not all of them promise the same results. The material and density of the bristles and the size of the brush are all factors that play into the end result. While vented metal round brushes are good for heat reinforcement while styling, boar bristle brushes are usually firmer and denser and create more tension when pulling the hair, which creates more volume and lift in the end.
And as far as diameter, round brushes follow the same concept as your curling irons: The bigger the diameter of the brush, the bigger the curl. Unless you’re a pro, don’t mess with brushes that are too small or you’ll run the risk of getting your hair tangled in the bristles.
How to Use a Round Brush to Blow-Dry Your Hair
01 of 06

According to Everett, how dry your hair should be when you start styling depends on your texture. “For example, if you have pretty straight hair, you can let it air dry or you can rough dry it with a blow dryer until it’s 80 percent dry before you then use a brush to dry and style it,” she says. “If you have coily hair, you will want to pull it straight with a brush while it’s soaking wet.”
02 of 06
Apply Heat Protectant and Section the Hair

“In order to keep the hair as healthy as possible, you want to use a heat protectant to block it from too much heat as well as to help avoid frizz,” says Everett. When it comes to selecting a heat protectant, look for something “that protects the hair up to 450 degrees, minimizes frizz, and is keratin-based,” says Everett. “Your hair is mainly composed of protein, and keratin is a protein that increases protein retention.”
After you’ve applied your heat protectant, you can section your hair. Start by separating it into four parts. You’ll want to work on one segment at a time, clipping the others up and out of the way.
03 of 06
Round Brushes: The best kept hairdresser secret and how to use it effectively
Round brushes have been the best kept secret of hairdressers since ages now. If you were one of those people who picked up a round hair brush by mistake at a young age and decided to never look back, you probably have no idea how painful the job of hairdresser is. This is a challenge that involves tangled hair, aching arms, and a decent amount of frustration and swearing.
Round brushes have been the best kept secret of hairdressers since ages now. If you were one of those people who picked up a round hair brush by mistake at a young age and decided to never look back, you probably have no idea how painful the job of hairdresser is. This is a challenge that involves tangled hair, aching arms, and a decent amount of frustration and swearing.
So, after years of trying to utilize a round brush correctly, we’ve decided to change everything. We have eventually realized where we have been making mistakes for so long. – Rayed Merchant, Director Marketing (Global) & Head Brand Procurement, SSIZ International shares how to utilize a round brush like a master.
Air-Dry is the key –
Blow drying your hair before it is 80% to 90% dry is a waste of time and energy. If your hair isn’t mostly dry before you start blow-drying, it will take too long to finish the style, which will cause your arms to get tired and cause you a lot of frustration. The key is letting it air-dry before you style it.
Choose a Round Brush –
The size of the brush, the bristle type, and their density are all factors that influence the result. While vented metal round brushes are good for heat reinforcement while styling, boar bristle brushes are often stiffer and denser and cause more tension when pulling the hair, resulting in increased volume and lift in the end.
The diameter of a round brush has the similar relationship to curl size as a curling iron: the bigger the brush, the bigger the curl. If you’re not an expert, stay away from utilizing little brushes because you run the risk of tangling your hair in the bristles.
Part Your Hair –
Taking your time when blow-drying your hair with a round brush is the fastest method to go about it. Wrapping too-large components around the circular brush will not save you any time because you will likely need to go back and replace them. Start by splitting your hair into four sections before proceeding.
Alter your angles –
It’s crucial that motion never stops while styling your hair. Start by applying the round brush in the following manner: place it at the base of your roots, roll it down to the ends, and dry the brush as you go. One thing to keep in mind is that, regardless of how you move the brush, you should always maintain the blow-nozzle dryer’s parallel to the ground and inclined downward to distribute heat evenly across the hair section rather than fluffing it up.
Change the heat settings –
High heat and high air may seem like the best option, but using just that combination will leave hair frizzy and tangled. Around your hairline, lower the settings to medium (or low if you have curly hair), and rely on the pressure you’re putting to the brush to smooth the hair.
Give it a cool air blast –
While the hair is still wrapped around the brush, turn down the heat setting for a cool air burst after finishing a segment. Your hair should maintain its shape thanks to this. Although omitting this step could seem like an unnecessary extra step, the results might not be as significant.


