Fan brushes are extremely versatile, as evidenced by the fact that they can have a spot in your nail painting kit, too. If you have an extra fan makeup brush (you won’t want to use the same one for your makeup and your nails), try this trick: Place three dots of nail polish on a paint palette before swiping a small fan brush through all of the colors. The colors should form a gradient on the brush, which you’ll then transfer to your nails. A swipe across each nail should result in a beautiful blend of colors. Trust us, everyone will be asking where you had your nails done.
How to Use a Fan Makeup Brush

So, you know a thing or two about makeup brushes. You’ve moved on from applying all of your makeup with the powder puffs and applicator sponges that come with your products; now you’ve mastered using a powder brush, a foundation brush, and even an eye shadow blending brush. But do you have the first idea of what to do with those cool fan-shaped makeup brushes? Despite what you might assume using a fan makeup brush isn’t something reserved for the pros. These uniquely-shaped brushes are amazing for applying all sorts of products—from highlighter to nail polish—and they’re also easy to use. So, what are you waiting for? Here’s how to use a fan makeup brush.
How to Use a Fan Makeup Brush to Apply Highlighter
If we had to name the way fan brushes are most often used, it would be to apply highlighter. Fan brushes are ideal for applying just a light dusting of any powder product, and this is exactly what you need when it comes to highlighter. You want your skin to lightly glisten, not look like you’ve loaded your cheeks with glitter—unless you’re headed to a festival, that is. Reach for a highlighter, like the L’Oréal Paris True Match Lumi Shimmerista Highlighting Powder, and dip your fan makeup brush into the powder. Tap the brushes handle on a hard surface (like the edge of your vanity) to get rid of any excess product, then lightly brush the highlighter onto the tops of your cheeks, down the bridge of your nose, and on your cupid’s bow. You’ll look lit from within—so pretty!
Do you live in perpetual fear of applying blush in the morning, only to realize later on that you’ve overdone it and your makeup resembles a clown? Don’t worry, we can relate. Blush can be tricky to get a handle on, but a fan makeup brush makes it all easier. As we said, fan brushes apply light dustings of powder products, which is less product than your average blush brush applies. Pick up just a little bit of the L’Oréal Paris Paradise Enchanted Fruit-Scented Blush Makeup in Bashful with your face makeup brush and brush it onto your cheeks, starting slightly past the apples of your cheeks. Using a fan brush for this step in your routine will result in a much more natural blush application and you’ll be able to rest easy knowing you don’t look overly flushed.
How to Use a Fan Makeup Brush to Apply Contour Powder
Contouring is officially a major beauty trend, so much so that everyone and their mother is doing it. Unfortunately, not everyone has this makeup technique down pat. The issue is, if you go overboard with contour powder, your face will start to look muddy. In actuality, the goal of contouring is to create the appearance of subtle shadows that accentuate your features. You can probably see where we’re going with this, but using a brush that applies product lightly can be a better way to create shadows. To give it a try, suck in your cheeks then use your fan makeup brush to apply contour powder to the hollows of your cheeks. You’ll still be able to sculpt your cheekbones to perfection but it won’t be quite so obvious that that’s what you’ve done.
Don’t you hate when you’ve flawlessly applied your face makeup, only to move onto eye shadow and have fallout ruin your concealer and foundation? Good news, when this happens, all hope isn’t lost. You can rescue your makeup with a little help from a fan makeup brush—that’s right, they’re good for more than just applying makeup! Carefully dust the fallout off of your face, then touch up if necessary.
How to use a fan brush

Fan brushes have an interesting shape, but how exactly should you utilize that shape? It can be tricky to know how you’re supposed to use fan brushes when other brushes are far more straightforward, especially when a few wrong moves with a fan brush could make your whole painting look super awkward! In this post, we’ll cover what fan brushes are and aren’t great for, so you can use them whenever they’ll suit your painting best.
Let’s start with. When you shouldn’t use a fan brush.
1. You shouldn’t use fan brushes to cover large surface areas. Loading up lots of paint on a fan brush will just drag it down. Fan brushes are very light and delicate, leaving lots of little gaps in our paint if you try to cover your surface with one.
2. Fan brushes aren’t ideal for precise details or linework; their shape makes it nearly impossible to guarantee where they will leave their mark on your canvas.
Now, let’s get into what fan brushes excel at!
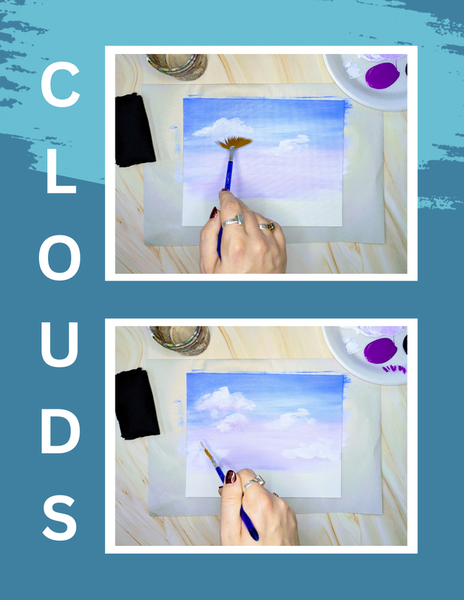
Fan brushes are great for getting clouds soft, fluffy, and nicely blended. To achieve this, you’ll want to paint on your sky before worrying about your clouds; you can paint a solid sky or a gradient like I did here! I prefer to paint clouds by painting on a couple of little blobs of my lightest color on my background while it’s still wet using a round or flat brush; then, I take my fan brush to feather out and soften the bottom edges.
Use a relatively small fan brush for clouds to get in there with it and have more control. If it’s still looking a little off to you, keep playing around with it, layer more of your highlight and shadow colors on top of your previous blends, and feather it more gently. Remember, clouds don’t need to be perfect; they need to look puffy!

Now, let’s get into trees, specifically evergreens. Fan brushes are best for painting evergreens like pines, spruces, and firs, just because the branches and needles grow out of them in more straight lines than other trees. You’ll want to use a larger fan brush for your branches because it’ll make it much easier to make everything look naturally spaced! Once you’ve used a small round brush to paint your trunk, use your fan brush to paint on their branches by holding your fan brush straight up from your canvas with just the very tips covered in paint.
The thing that makes fan brushes perfect for this is the way the brush’s hair separates organically when there is paint on this brush; it creates a really natural-looking spacing between the spots where the needles would be.

These brushes are fantastic for achieving texture in grass and brush! In general, they’re wonderful for natural scenes and landscapes; you can even use them to add stars to paintings or sparkling highlights on water. However, right now, we’re talking about brush; as you can see in the example, fan brushes make grass look natural and easily create fabulous texture. Instead of just tapping your brush on your surface as you would with trees, you’ll want to make quick upward strokes and lift off fast.
For bushes, you’ll want to combine how you paint clouds and trees, so start off with a more fluffy, blended base of your base color, then go over the top and tap on highlights and shadows. This technique will give you beautiful, soft bushes!
Now, you can create a beautiful nature scene with a fan brush. If you use any of these tips, I’d love to see it! You can email me at [email protected] or tag us on Instagram @thesketchingpad.


