Complete Pinecone drawing
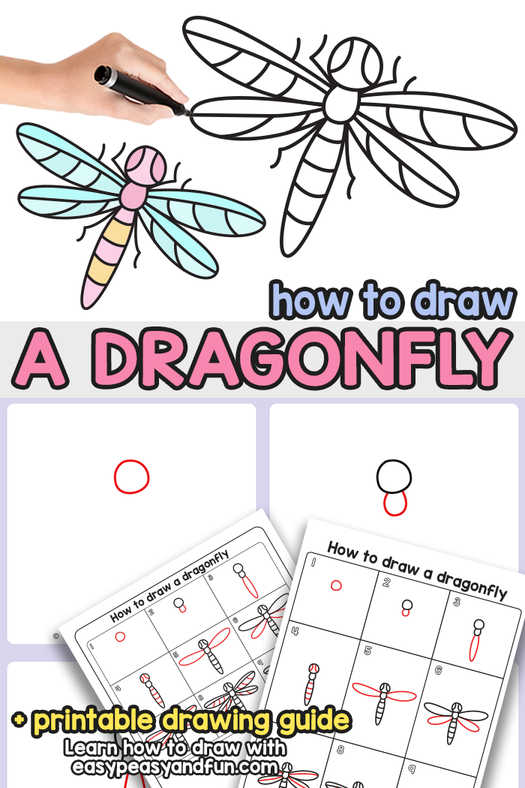
How to draw a pine tree step by step tutorial easy for begginer,come to see my online class
Watercolor forest, the characteristics of water draw the fog in the forest, natural and mysterious. The pigment blends in the water for a natural feeling.
How to start a painting business:
1. Set up your own website and earn advertising fees for the website. The income comes from advertisers such as Google Adsense., Record your painting process into a video, and make it into a picture and text explanation. Attract users to your website and earn advertising fees at this time.
2. Your hand-drawn painting. It can be sold on ETSY, Amazon, and eBay.
3. You can record your painting process, and use video editing software, such as iMovie, Premier, etc., edit, and then put it on youtube, make your own channel, and earn youtube advertising fees.
Watercolor blue rose tutorial easy step by step easy for a beginner, come to see my web online class

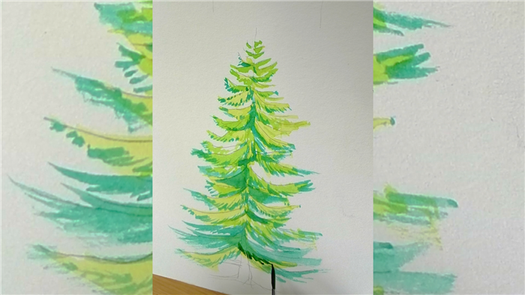
1. Draw the pine tree leaves. At the first, draw the overall shape of the leaves in light green.

2. Use the darker green. Painting the shadow of the leaves, now it starts to appear the three-dimensional feeling. It should be noted here that there are not too many dark parts, but a few parts under the leaves.

3. Use the darker green. Painting the shadow of the leaves, now it starts to appear the three-dimensional feeling. It should be noted here that there are not too many dark parts, but a few parts under the leaves.
4. Paint the deepest part of the leaf. Use black-green color to decorate the shaded part of the leaf, notice that there is the least black.
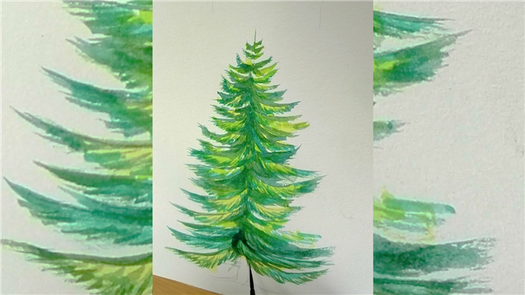
5. Draw a vertical line with a brown one rather than a straight one.

6. draw a tree trunk. Draw a vertical line with a brown one rather than a straight one. draw the branches of the tree trunk, the composition should be natural, like a long triangle, below long, above short

Trees are closely related to human health. Trees absorb carbon dioxide and emit oxygen during the day. The green of the leaves also relieves fatigue for our eyes. Being in the woods will give us a very relaxed feeling because the woods emit a lot of negative ions, and negative ions are very good for our health. So many artists like to paint pine trees. Sometimes when you see the painting of pine trees, it is as if you have seen a forest, as if you have brought your body and mind to that piece of relaxation, full of vitality, and a large forest full of oxygen.
How to start a painting business:
1. Set up your own website and earn advertising fees for the website. The income comes from advertisers such as Google Adsense., Record your painting process into a video, and make it into a picture and text explanation. Attract users to your website and earn advertising fees at this time.
2. Your hand-drawn painting. It can be sold on ETSY, Amazon, and eBay.
3. You can record your painting process, and use video editing software, such as iMovie, Premier, etc., edit, and then put it on youtube, make your own channel, and earn youtube advertising fees.
How to Draw a Pinecone
Learn how to draw a great looking Pinecone with easy, step-by-step drawing instructions, and video tutorial.
By following the simple steps, you too can easily draw a perfect Pinecone.

Complete Pinecone drawing
Pinecones are the seed-bearing fruit of about 120 different species of pine tree. Pines are found throughout the world, especially in the cold northern reaches.
The trees are evergreen, meaning they do not lose their leaves in winter. Some pinecones produce edible seeds called pine nuts, piñons, or pinyons.
Pinecones have long been pictured in artwork; in ancient times, the pinecone served as a symbol of life or fertility. For example, carvings from the palace of an ancient Assyrian king depict divine figures with pinecones in hand.
Scroll down for a downloadable PDF of this tutorial.
The pinecone was thought to be the fruit of the famed Tree of Life, since the pine tree itself never seemed to go dormant.
Perhaps the largest pinecone in the world is located in Vatican City. The Fontana della Pigna, meaning “Fountain of the Pinecone,” features a four-meter-tall bronze pine cone once stood at the Temple of Isis in Rome.
Pinecones themselves are sometimes used as an artistic material. They are commonly used for making wreaths or birdfeeders.
Before the advent of manufactured toys, children in many countries made “cone cows” or other animals by wedging sticks between the scales of the cone – the cone served as the cow’s body and the sticks, its legs.
In Finland, one fairground hosts sculptures of “cone cows” that are large enough for children to climb and “ride” on.
Would you like to draw a prickly pinecone? This easy, step-by-step plant drawing guide is here to help.
All you will need is a pencil, pen, or marker and a sheet of paper. You may also wish to color your finished drawing.
If you liked this tutorial, see also the following drawing guides: Christmas Wreath, Acorns, and Fall Tree.
Step-by-Step Instructions for Drawing a Pinecone

How to Draw a Great Looking Pinecone for Kids, Beginners, and Adults – Step 1

1. Begin by drawing a twig. Use long curved lines of different lengths to form the twig. Allow them to meet in sharp or gentle points.
Easy Pinecone Drawing – Step 2

2. Draw another twig emerging from the first. Draw a pair of curved lines and allow them to meet at a sharp point. Then, draw the pine needles emerging from this twig. For each needle, use two curved lines that meet at a sharp point. Notice that the needles near the base of the twig are larger than those near its tip.


Easy Pinecone Drawing – Step 3

3. Draw needles along the longest twig. For each needle, draw two curved lines and allow them to meet at a sharp point.
Easy Pinecone Drawing – Step 4

4. Draw another twig emerging from the bottom of the existing twig. Draw the twig using curved lines that meet in a point. Then, draw needles along the twig, using two curved lines for each, allowing them to meet in a point.
MORE DRAWING TUTORIALS:
How to Draw a Tomato

How to Draw Pears

How to Draw a Lemon

Easy Pinecone Drawing – Step 5
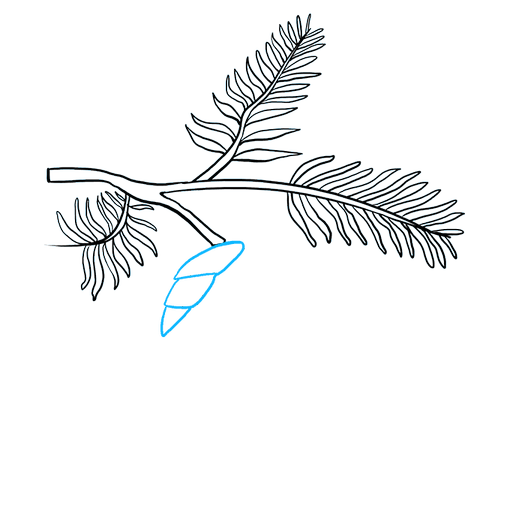
5. Begin to draw the pinecone itself. At the end of the remaining twig, enclose an irregular shape like a rounded, upside-down triangle. Then, enclose a rounded, four-side shape beneath this. Finally, enclose a small rounded triangle beneath the previous shapes. These “leaves” of the pinecone are called scales.
Easy Pinecone Drawing – Step 6

6. Continue drawing overlapping scales. Notice that the scales are shaped like rounded triangles or four-sided shapes, each with their points facing downward.
Easy Pinecone Drawing – Step 7

7. Continue drawing the overlapping scales of the pinecone. Notice that as the pinecone grows longer, it also becomes narrower.
MORE DRAWING TUTORIALS:
How to Draw Broccoli

How to Draw a Banana

How to Draw Cherries
Add More Details to Your Pinecone Picture – Step 8

8. Continue to draw the pointed scales of the pinecone. Notice that the scales themselves are smaller than those at the top of the pinecone.
Complete the Outline of Your Pinecone Drawing – Step 9

9. Draw pointed, three-sided scales to finish filling out the shape of the pinecone along the edges and the tip.
Color Your Pinecone Drawing
Color your pinecone. Most pinecones are brown in color, a fine contrast to the dark green of the pine needles.
You’ll find plenty of other trees, including close-ups like this one, among our selection of plant drawing guides.
For more great Tree drawing tutorials, see the 21 Easy Tree Art Projects for Kids post.
Easy, step by step Pinecone drawing tutorial

Click HERE to save the tutorial to Pinterest!
Pinecone Drawing Tutorial – Easy & Fun Printable Pages
Join now and get immediate access to thousands of printable drawing instruction and practice pages!


MEMBER TROUBLESHOOTING
Still seeing ads or not being able to download the PDF?
First, check that you’re logged in. You can log in on the member login page.
If you’re still not able to download the PDF, the likely solution is to reload the page.
You can do this by clicking the browser reload button.
It is a circular arrow-shaped icon at the top of the browser window, typically found in the upper-left side (you can also use keyboard shortcuts: Ctrl+R on PC and Command+R on Mac).