Fill the new shape with a dark linear gradient from blue to black and set the Blending Mode to Screen in the Transparency panel.
10 Steps to Draw a Cute Glowing Jellyfish in Adobe Illustrator
Follow this tutorial and learn to draw a cute glowing jellyfish in 10 easy steps, using basic geometric shapes, Pathfinder panel, and various Effects. We’ll be applying vivid gradients to make our character look glowing and bright. Are you ready to explore the underwater fauna together? Let’s start!
- Program:Adobe Illustrator CS6 – CC
- Difficulty: Intermediate
- Topics Covered: Shape Building, Pathfinder Panel, Effects, Stroke Panel, Gradient Tool
- Estimated Completion Time: 20 minutes
Final Image: Cute Glowing Jellyfish

Let’s start with the background. Take the Rectangle Tool (M) and single-click it anywhere on the background to create a 600 x 600 px dark-blue square.

Step 2
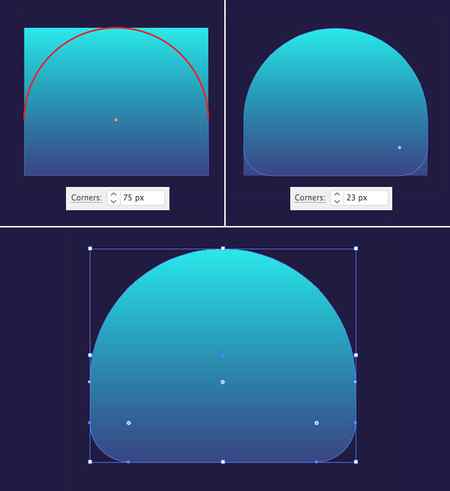
Continue using the Rectangle Tool (M) and make a 150 x 120 px rectangle. Open the Gradient panel (Window > Gradient) and set the color of the sliders to electric blue and dark navy blue. Use the Gradient Tool (G) while holding down Shift to adjust the direction of the fill.

How to Draw a Jellyfish – Let’s get started!
Starting on the upper portion of your paper, draw a downward curved shape to outline the hood of your jellyfish.
When drawn correctly, it should look like a three-quarters of a circle shape, as shown in the illustration.
Drawing this shape freehand can be quite difficult, so don’t hesitate to use a compass to help you in perfecting the outline.
A compass is a drawing tool that assists you in drawing a perfect circle quickly and easily. When using a compass, simply draw a circle and erase the quarter bottom line.
Step 2 – Outline the Bell Shape Body of a Jellyfish
Complete the body of the jellyfish by drawing multiple connected curved lines below the hood outline we drew in the previous step.
After finishing this step, the outline of your jellyfish’s body should now be closed off, making it whole and complete.
Step 3 – Draw One of Your Jellyfish’s Tentacles
Draw the first tentacle underneath the body of your jellyfish.
We think the tip of the tentacle looks best when it’s rounded, as shown in the illustration. However, you can also make it pointed if you like!
How to Draw a Jellyfish

Have some jellyfish drawing fun with this How to Draw a Jellyfish Step-By-Step Drawing Tutorial. We’ve included a free printable step-by-step worksheet too!
Active Time 20 minutes
Total Time 20 minutes
Difficulty easy
Materials
Tools
- Drawing Pencils
Instructions
 Start with drawing the bell of the jellyfish. Draw an arch at the top of the page and then make the bottom of the arch with a squiggly line.
 Draw a similar squiggly line from the previous step below the first one and make it slightly shorter. then draw a small line from the end of the line up to the bottom of the jellyfish body.
 When drawing the tentacles think of spaghetti-like legs coming out the bottom of the jellyfish body. We like to start on one side like the left side and draw a short tentacle. Then draw another tentacle slightly longer to the right.
 Continue drawing the tentacles and varying in length and making them flowy.
 Finish drawing the tentacles varying the lengths.
 Draw on oval shape drawing of eyes.
 The last step is to draw in eyeball in the eye shapes and then a small smile. Brings your cartoon jellyfish to life!
 Once you have your drawing exactly how you want it, we recommend tracing over all your lines with a sharp pencil. Then use markers, crayons, pencils, or paints and turn your drawing lesson into jellyfish art!
© Alli Ward
Project Type: Drawing / Category: Coloring Pages for Kids
CONNECT WITH MADE WITH HAPPY!
Be sure to follow me on social media, so you never miss a post!
Find and shop my favorite products in my Amazon storefront here!
HOW TO DRAW A JELLYFISH
PIN IT TO YOUR DIY BOARD ON PINTEREST!
FOLLOW MADE WITH HAPPY ON PINTEREST FOR ALL THINGS HAPPY!

–>
More Summer
How to Draw a Lion Easy Step-By-Step Tutorial
Simple Sunflower Craft With Paper Plates For Kids
Easy Paper Pineapple Craft For Kids
How To Draw a Pineapple
About Alli
Alli is a lifestyle blogger with a love for making all things HAPPY.
CRAFTS.FOOD.HOME.FOOD.TRAVEL.FAMILY all made with HAPPY

About Alli

Hi- I’m Alli Ward, the Maker behind Made with Happy. I’m a color-obsessed creative mom of two sharing easy crafts, printables, and home DIY projects that the whole family will love!


